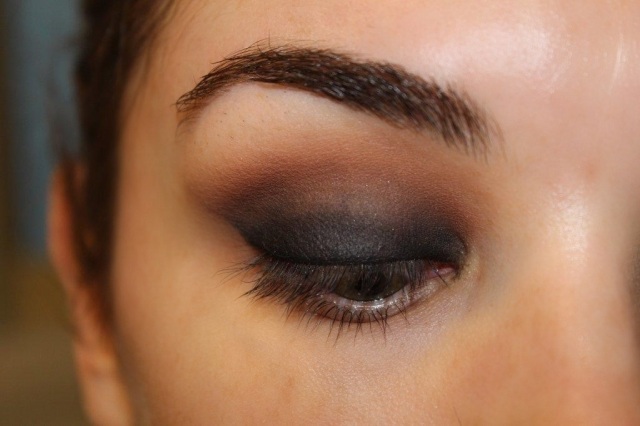
Firstly Happy Valentines Day my loves!! I hope you’re having a lovely day no matter what you’re doing. Well, here is the fourth and final look in my Valentines Day series. This is my take on a smokey eye… So if you want to see how I do this read onwards xx
~STEP 1~
As this is a strong look with dark colours I definitely don’t want this look to crease so I prime my eyes with Shadow Insurance by Too Faced Cosmetics. Then taking Crème Brûlée by Makeup Geek on my E45 Small Tapered Blending Brush by Sigma I place this just above my crease and blend thoroughly.
~STEP 2~
Using the same brush I take Cocoa Bear by Makeup Geek and blend into my crease and upwards into where I placed Crème Brûlée. Blend until the two colours transition smoothly.
~STEP 3~
Next I take my Bobbi Brown Long-Wear Eye Pencil in Jet (I am obsessed with this btw – it is the only eyeliner pencil that actually stays put and doesnt smudge underneath my eyes) and roughly line my upper lash line.
~STEP 4~
Taking The Shader Brush from my Hair and Makeup Addiction Luxury Set, I blend the liner over my lid. When doing this make sure to NOT blend it into you crease – stop just before the crease. If you take it further you’re going to end up with too much black, you will lose your transition colours and end up looking like a panda or two burnt holes in a blanket
~STEP 5~
After I have blended the eyeliner over my lid I take Corrupt by Makeup Geek on the same brush The Shader we used to blend in the eyeliner. To place this on the lid I gently pack it on in patting motions.
~STEP 6~
BLEND! This is the key element in making this look work. So I take the same E45 brush we used earlier and take a little more Cocoa Bear and start blending Corrupt and Cocoa Bear together until the two become seamless and transition nicely.
~FINISH~
Once I am happy with the blending of the two colours. I apply my fave mascara – Goddess Mascara by Eye of Horus. Then I line my lower lash line with Mocha by Makeup Geek with The Detailer by Makeup and Hair Addiction and add a coat of Goddess Mascara by Eye of Horus. Then to lighten my inner corner a bit I add the colour Nylon by MAC Cosmetics with my finger tip and then applied a nude lip using the shade Shy Girl by MAC Costmetics and TA DAAAAA all finished!
So I know this look is a little bold but I hope you like it and if you try it out and like it I would love to hear about it.
Till next time xoxo


I got to the third picture and was like, “nope, nope, wonky eyeliner.” so glad i kept scrolling! beautiful look
Hahaha I’m glad you kept scrolling too – so you could see I’m not that bad at eyeliner 😉
Thanks so much for the support lovely xx
I just went through every post of yours, and your makeup skills are absolutely amazing! What foundation do you use? I can’t get over your skin
Hahaha wow! That means so much to me. Thank you. I actually jump around on what foundation I use but my top 3 faves are: Yves Saint Lauren touché éclat, MAC Studio Sculpt and Nars Sheer Glow 🙂 but don’t forget that the primer you use and your skin care regime play an important part also 🙂 xx
I have the Nars Sheer Glow, but I’ll have to try the other two! I’m going to wait a bit because I have about 6 foundations on the go right now.. It’s a little out of hand.
Haha you sound like me – you don’t even want to know how many I have lol! Well here’s a tip… As I have dry skin I always am looking to get that luminous glowy look. I find that mixing in a bit of MAC’s strobe cream in with your foundation and then applying it as normal really helps 🙂
I’ll have to try it out! I use the Josie Maran Argan Illuminizer occasionally, but I have pretty oily skin 😦