Valentines Day Look 4

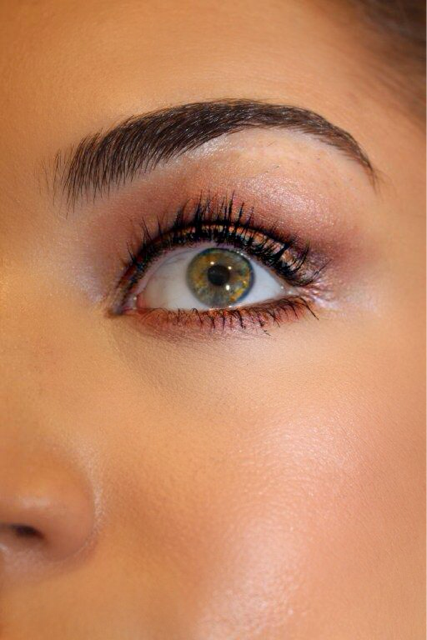
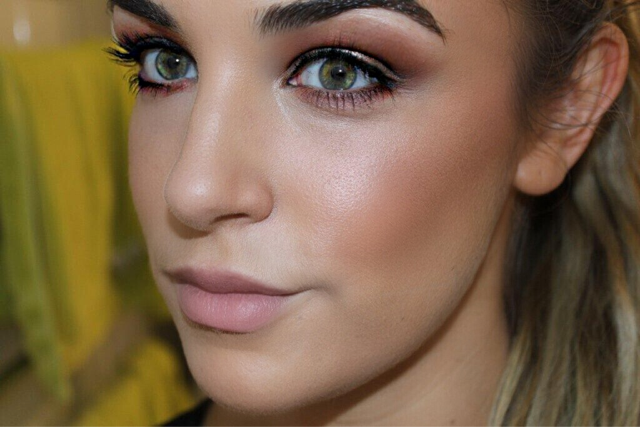
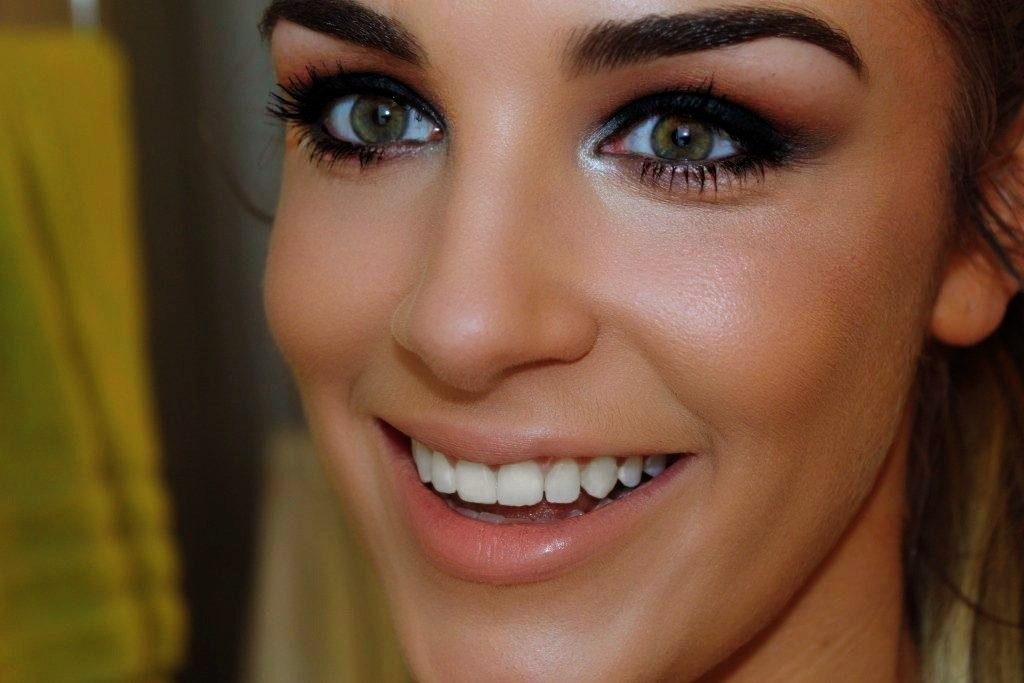
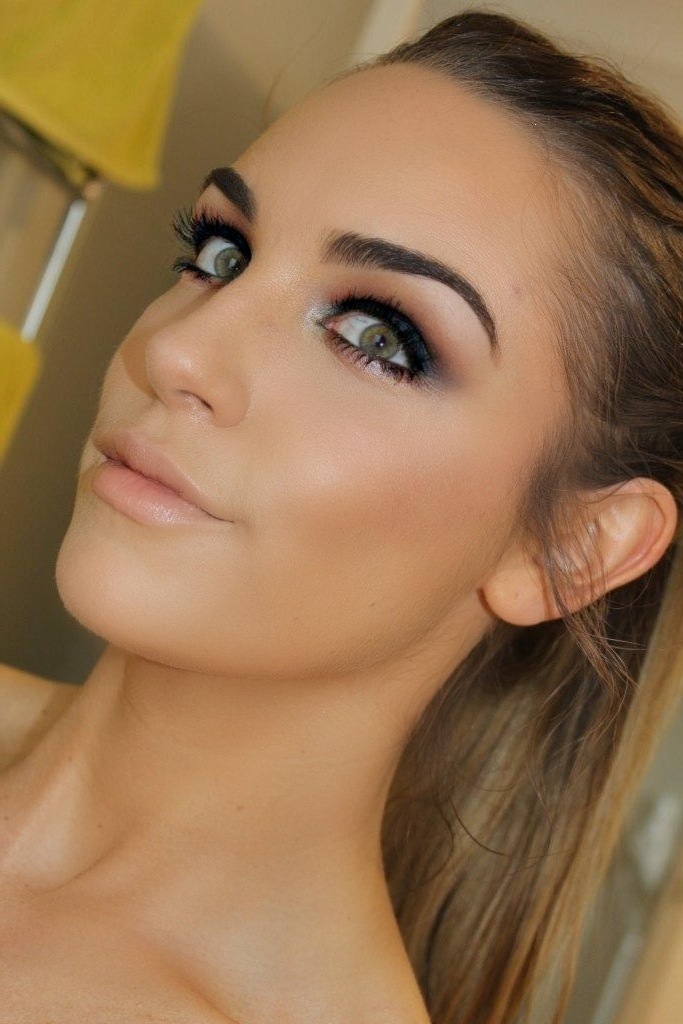
Firstly Happy Valentines Day my loves!! I hope you’re having a lovely day no matter what you’re doing. Well, here is the fourth and final look in my Valentines Day series. This is my take on a smokey eye… So if you want to see how I do this read onwards xx

~STEP 1~

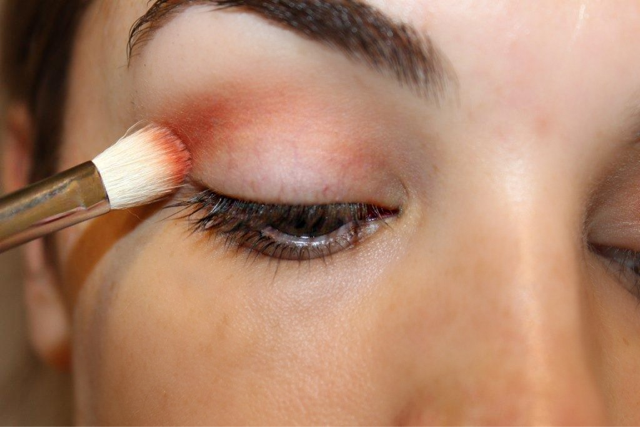
As this is a strong look with dark colours I definitely don’t want this look to crease so I prime my eyes with Shadow Insurance by Too Faced Cosmetics. Then taking Crème Brûlée by Makeup Geek on my E45 Small Tapered Blending Brush by Sigma I place this just above my crease and blend thoroughly.
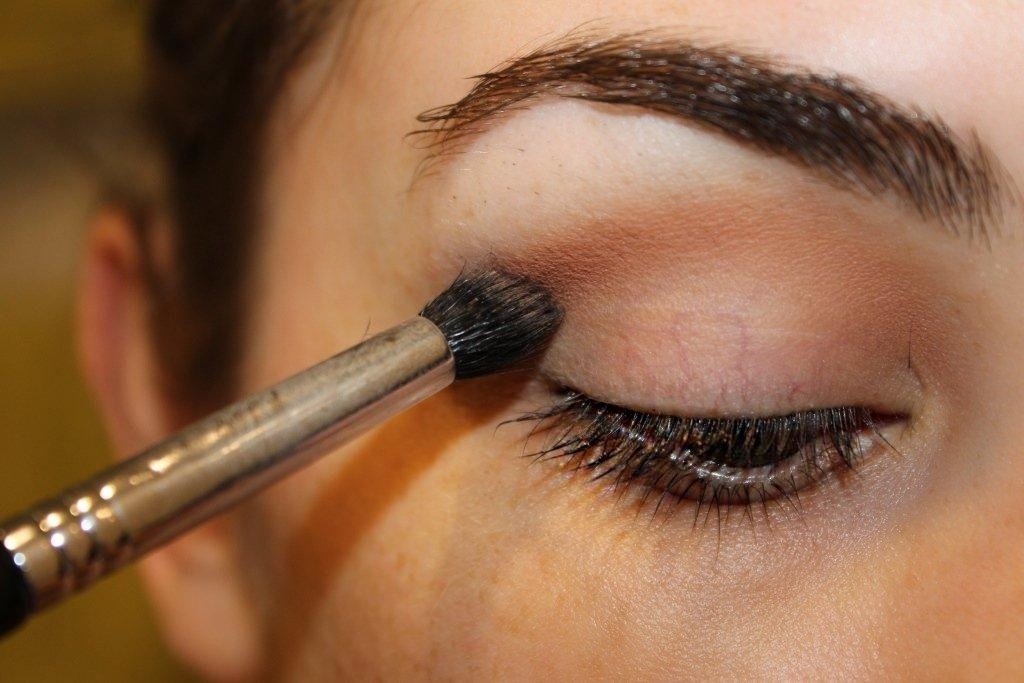
20140213-212330.jpg

~STEP 2~

Using the same brush I take Cocoa Bear by Makeup Geek and blend into my crease and upwards into where I placed Crème Brûlée. Blend until the two colours transition smoothly.

20140213-212347.jpg

~STEP 3~

Next I take my Bobbi Brown Long-Wear Eye Pencil in Jet (I am obsessed with this btw – it is the only eyeliner pencil that actually stays put and doesnt smudge underneath my eyes) and roughly line my upper lash line.

20140213-212413.jpg

~STEP 4~

Taking The Shader Brush from my Hair and Makeup Addiction Luxury Set, I blend the liner over my lid. When doing this make sure to NOT blend it into you crease – stop just before the crease. If you take it further you’re going to end up with too much black, you will lose your transition colours and end up looking like a panda or two burnt holes in a blanket
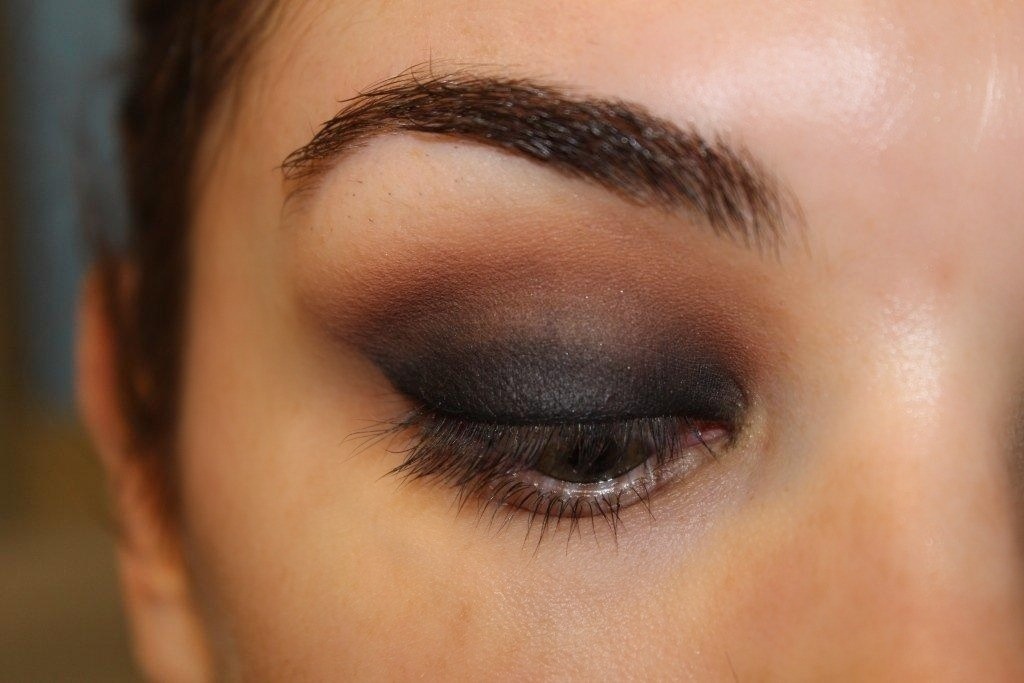
20140213-212428.jpg

~STEP 5~

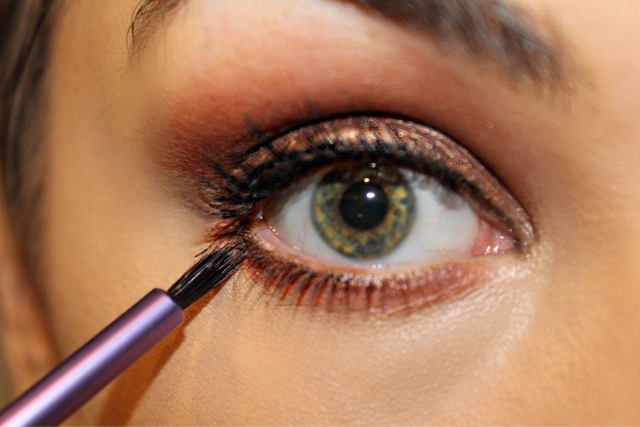
After I have blended the eyeliner over my lid I take Corrupt by Makeup Geek on the same brush The Shader we used to blend in the eyeliner. To place this on the lid I gently pack it on in patting motions.

20140213-212507.jpg

~STEP 6~

BLEND! This is the key element in making this look work. So I take the same E45 brush we used earlier and take a little more Cocoa Bear and start blending Corrupt and Cocoa Bear together until the two become seamless and transition nicely.

20140213-212522.jpg

~FINISH~

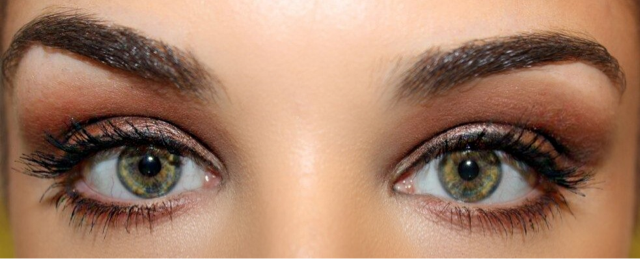
Once I am happy with the blending of the two colours. I apply my fave mascara – Goddess Mascara by Eye of Horus. Then I line my lower lash line with Mocha by Makeup Geek with The Detailer by Makeup and Hair Addiction and add a coat of Goddess Mascara by Eye of Horus. Then to lighten my inner corner a bit I add the colour Nylon by MAC Cosmetics with my finger tip and then applied a nude lip using the shade Shy Girl by MAC Costmetics and TA DAAAAA all finished!

20140214-153702.jpg

20140214-153812.jpg

20140214-154035.jpg

20140214-154055.jpg

So I know this look is a little bold but I hope you like it and if you try it out and like it I would love to hear about it.

Till next time xoxo

Valentines Day Look – No. 3

So here is the third look in my Valentines Day series. This one focuses on lashes and bold lip… To see how I get this read on through 🙂

~STEP 1~

As always I start by priming my eye using my trusty Shadow Insurance by Too Faced Cosmetics, then taking my E25 Blending Brush by Sigma and the colour Grain by MAC Cosmetics and blend it all over my lid but not up into my crease.

20140213-114405.jpg

~STEP 2~

Taking the colour Texture by MAC Costmetics and using my E45 Blending Brush by Sigma I blend it into and above my crease.

20140213-120441.jpg

~STEP 3~

To ensure my crease colour is blended smoothly towards my brow bone I take a mixture of Vanilla Bean and Beaches and Cream both by Makeup Geek on my E35 Tapered Blending Brush by Sigma and blend those colours together softening up the transition of the crease colour.

20140213-120504.jpg

~STEP 4~

To intensify my crease I take the colour Handwritten by MAC Cosmetics on my E36 Blending Brush by Sigma and blend it directly into my crease.

20140213-120514.jpg

~STEP 4~

Once the crease colours have been blended together, I first curl my lashes with my Full Lash Curler by MAC Cosmetics, then taking my Skinny Liquid Liner by Eyeko in black and line my upper lash line, ensuring to get as close to the lashline as possible. Then taking my Goddess Mascara by Eye of Horus I apply a couple of coats on the top lash line.

20140213-163413.jpg

20140213-163424.jpg

~STEP 5~

Here is where I apply my false lashes, as I wanted to keep this look as natural as I could. I chose to add a pair of Velour Lashes in the style – “The Extra Oomph” these lashes are amazing. They mink hair and are about 5-15mm long. As you can see from the picture below they really do add a little extra something to your eyes and because they are accent type lashes they are super easy to apply.

20140213-163438.jpg

20140213-163451.jpg

~FINISH~

So to finish off the look I simple coat my bottom lashes with Goddess Mascara by Eye of Horus. You could leave the look here or you could add a bold lip like I did. I chose to go with a matt red shade – Chanel Rouge Allure Velvet in the shade 38 La Fascinate and there you have it! Look complete.  

20140213-170234.jpg

So there you have it peeps, I hope you liked this look – if you don’t think you could do the red lip, this look could work in any colour you feel comfortable.

Till next time xoxo

Valentines Day Look – No. 2

Hey Loves,

As I mentioned in my previous post – I would be doing 4 looks, so here is my second look. It’s a bit different and possibly not for everyone, but I find this really makes my eyes pop. So if you’re interested to see how I create this look, read on 🙂

~STEP 1~

So as always I start off my priming my eye with my trusty Shadow Insurance by Too Faced Cosmetics. Then taking the colour Red Brick by MAC Cosmetics on my Sigma E25 Blending brush, I blend this into and well above my crease. I keep blending until the colour becomes a softer shade.

Image

~STEP 2~

To deepen my crease – I take Handwritten by MAC Cosmetics on my Sigma E36 Blending brush and blend that directly into my crease.

Image1

~STEP 3~

For my lid I wanted a nice bronze colour so I chose my favourite shade – Woodwinked (again) by MAC Cosmetics. Taking my Sigma E35 Blending brush I blend that into and all over my lid. I then take the E36 brush I used earlier and go back over my crease to make sure the colour stays strong.

Image2

~STEP 4~

To smoke this look out a bit more I chose to darken my outer V with the shade Espresso by MAC Cosmetics and the same E36 brush used earlier, and concentrate this colour directly into my outer V and taking it a little of the way into my crease but not too far as I want to keep Handwritten the prominent crease colour.

Image5

~STEP 5~

So now that I have the colours all on and blended nicely to how I want them – I then line my upper lash line with Skinny Liquid Eyeliner in black by Eyeko. This time I didn’t take this out for a winged cat eye effect as there is already a lot going on with the colours. Together with a few coats of mascara, lining my upper lashline will give the illusion of much thicker lashes. So from here I just apply my foundation like normal…

Image3

~STEP 6 – optional~

This step is optional. After I applied the my favourite Goddess Mascara by Eye of Horus (which you could do to and then add some to your  bottom lashes and be on your way) – I wanted to make it a bit more intense. So I took my new favourite brush for under eye detailing – aptly named The Detailer by Hair and Makeup Addiction and use Red Brick again – placing it all along my lower lash line ensuring its well blended. Using my Accent Brush from Real Techniques I apply a small amount of Espresso blending it into my lower lashline where I placed Red Brick.

Image6

Image7

~Finish~

To finish off the look I add a few coats of Goddess Mascara by Eye of Horus to my lower lashes and a nude lipstick (the names worn off it :() there you have it… I hope you like it I know it’s a bit different but if I always did the same look you and I would both be bored 🙂

Image12 

Image11

Image9

Image10

Till next time xoxo

Valentines Day Look – No. 1

Hello my loves,

It’s hard to miss Valentine’s Day coming up, and whether you’re looking forward to being romantically spoilt by your man or are dreading the date with the strength of a thousand suns, you should look fabulous. Stock up on wine, get the boy or your single girlfriends around and recreate one of these looks so you look hot for the occasion. This is the first of the four Valentine’s styles I’ll be showing to you this week.

~STEP 1~

I primed my eye with my trusty Shadow Insurance by Too Faced. Then taking Blanc Type by MAC Cosmetics, I blended that all over my lid and up to my brown bone with my E35 Tapered Blending brush by Sigma.

photo 4

~STEP 2~

Taking Malt by MAC Cosmetics I use my E45 Small Tapered Blending brush by Sigma and place that in and just above my crease. Make sure this is blended out completely and there are no harsh lines. The idea is to create a soft shadow effect.

photo 5

~STEP 3~

As I want a little bit of shine to the lid I use a mixture of Shimma Shimma and Vanilla Bean by Makeup Geek and blend that all over the lid with the same E35 brush I used earlier. Then I take the E45 brush I used for my crease and go back over my crease to strengthen the colour.

photo 6

~STEP 4~

As I want to sharpen up my crease a little more, I take my E36 Blending brush (perfect for precise application to the crease)by Sigma and the shade Moondust by Makeup Geek and apply it using windscreen wiper motions, blending it directly into the crease.

photo 1

~STEP 5~

Then taking a baby wipe I quickly clean up under my eyes and then create a sharp line on the side of my eye (this is how I mark out where my liner will go).

photo 3

~STEP 6~

Now if you want you could leave the look as it is and just apply mascara and it would still look lovely. I however chose to add a cat eye flick. Now I understand that this isnt easy but the only way you can improve is to practice practice and then practice some more. I personally find it easiest to start by drawing a line across my upper lash line. So for todays look I wanted a more matt finish for my eyeliner so I went with my trusty fave – Schwing Liner by The Balm.

photo 2

~STEP 7~

Then I draw a line out to however far I want it and then take it back down and fill it in to my desired thickness. Excuse the poor quality of this liner today as my hands were a little shakey (I may or may not have had a few drinks the night before… dont judge me). Again this is personal preference but I like to take the same shadow I used in my crease and line the lower lash lne with it. So I took the colour Moondust again and lined my lower lashline and then finished off the look with a few coats of Goddess Mascara by Eye of Horus on top and bottom lashes… TA DAAAA!

photo 9

photo 12

~STEP 8 – optional~

So from here you could just put on some clear lip gloss, a nude or a coloured lipstick. I’ve shown the look below with a coloured lip. Here I am wearing Sheen Supreme lipstick in the shade Candy Apple:

valentines candy apple lip

Well I hope you liked this look, its a pretty simple look but I like it because it allows you to go from day to night and you can apply any lip colour you want. Depends on how daring you want to be 😉

Till next time xoxo