Everyday Sparkle

Hi loves,

It has been forever and a day since I was last on here… Please forgive me – Ive had a lot going on in my life such as moving house, not once but twice, starting a new job, leaving that job and now starting a new one. So… I’ll stop waffling on and get right into my next tutorial…

I dont know about you but I love anything sparkly… So I try to incorporate it into as much of my makeup looks as possible which can be hard in the professional working environment 😉 so see below before a step by step on how to incorpate this into an every day look…

~ STEP 1 ~

You should always prime your eyes, but if you are using a shimmery shadow – you definitely need to prime! For this I turn to my trusty Shadow Insurance by Too Faced Cosmetics, then applying a thin layer of Soft Ochre Paint Pot by MAC Cosmetics – setting it with Blanc Type shadow also by MAC Cosmetics.


~STEP 2~

Taking Soft Brown by MAC Cosmetics and my Sigma E40 Tapered Blending Brush and blend that into and above my crease – this will be my base transition shade.

~STEP 3~

Using the colour Bandit by Colour Pop and my Sigma E35 Tapered Blending Brush I place this directly into the crease – further deepening the colour and getting that rusty brown colour I love.

~STEP 4~
To deepen the outer V and crease further and add a slight smokey effect – I take my E45 Small Tapered Blending Brush by Sigma, and the colour Embark by MAC Cosmetics and blend that into the outer V and partly the way into the crease, blending it out till there are no harsh lines.


~STEP 5~

Using my new favourite shadow – I Heart This by ColourPop, I first apply this using my fingers and pack it on – then taking a firm brush (I just used the one from my Urban Decay palette) I smooth out the colour I’ve placed on my lid, then taking a bit more on the same bush, I go over the top – to make it a bit more intense. Taking the same E45 Small Tapered Blending Brush I go over the outer V and some of the crease to ensure the smokey dark colour is prominent.


~FINISH~

To finish this look I line my lashes using Rimmel’s Glam Eyes Liquid Liner and creating a cat eye effect, together with a few coats my lashes with a few coats of my favourite mascara – Le Volume De Chanel. Apply my foundation (see my earlier post on how I do this here). Line my lower lashline with Bandit using my Sigma E20 Short Shader Brush and coating my bottom lashes with Le Volume De Chanel.


 While its not an overly complicated look, i think it has great impact mainly because of the gorgeous feature shade – I Heart This by ColourPop. So have a look and let me know what you think or if you give this a try at home.
Till next time xoxo

My Foundation Routine!!

HOWDY HO BABES!

I get asked all the time about my foundation routine, so I thought I would do an updated step by step guide of what I do and what works for me. Please note I am aware that this might seem like a lot of makeup for some but I like it so, that’s that! If you would like to see how I achieve this, then read on my loves!

~ PREP AND PRIME ~

For me this is one of the most IMPORTANT steps to having a flawless face and I do this on both myself and all my clients. By doing this it really helps make the makeup last all day and night 🙂 Firstly you need to understand your skin type so know you know how best to prep and prime your skin. For me, my skin is on the dry side so I prep my skin by rehydrating it with my holy grail moisturizer combo of Embryolisse 24 Hour Miracle Cream, and Bobbi Brown’s Hydrating Face Cream. I Let that sink in for about 5 minutes (this is where I usually go and do my eyes, and then come back and finish off my face). To prime my face I apply Hourglass’s Veil Mineral Primer and then apply my favourite illuminizer, MAC’s Strobe Cream.

/home/wpcom/public_html/wp-content/blogs.dir/69d/45502932/files/2015/01/img_8243.jpg

~ FOUNDATION APPLICATION~

I am a HUGE fan of actually mixing different foundations. It’s rare to find or expect one foundation to give you the exact colour or coverage you want or so, I am always experimenting and trying out different combos. Currently this is the one that I am really digging… Taking my new fave liquid foundation by Make Up Store in the colour Honey (which doesn’t appear to be on their site however, if you contact the store directly then they can make arrangements to ship to you. Click here for the store closest to you) together with EX1 Cosmetics Invisiwear Liquid Foundation in the colour 200 (or 300 if I am more tanned or have some fake tan on). I take two pumps of the Makeup Store foundation and one pump of the EX 1 foundation, mix it together and apply all over my face with my trusty Beauty Blender.

/home/wpcom/public_html/wp-content/blogs.dir/69d/45502932/files/2015/01/img_8244.jpg

/home/wpcom/public_html/wp-content/blogs.dir/69d/45502932/files/2015/01/img_8246.jpg

~ CONCEAL AND HIGHLIGHT ~

To conceal my dark circles I take NARS Radiant Creamy Concealer by NARS in the shade Honey and place this directly under my eyes in a “C”shape. To highlight my face I take the same concealer but in the shade Ginger and place it under where I placed the Honey shade, under my eyes  in an upside down triangle shape. I then take this colour down the bridge of my nose and up to my forehead and a little on my upper lip and chin. To blend this all out I use my Beauty Blender, again 🙂

/home/wpcom/public_html/wp-content/blogs.dir/69d/45502932/files/2015/01/img_8249.jpg

~ SETTING AND CONTOURING ~

To set my concealer I use The Chisler Brush by Hair and Makeup Addiction with Chanel’s Le Blanc Fresh Glow Loose Brightening Powder. As I am naturally dry I prefer a dewy look so I don’t like to use a lot of powder, so, to set the rest of my face I use another Make Up Store product, their Micronized Compact Powder in Latte (again not on the website so if you want to contact your closest store – click here).  To apply this I use the Blush Brush by Real Techniques and gently pat it over the foundation. To contour and carve out some cheek bones I use the NARS Ita Kabuki Brush and Too Faced Chocolate Soliel Matte Bronzer with my MAC 168 Large Angled Contour Brush.

/home/wpcom/public_html/wp-content/blogs.dir/69d/45502932/files/2015/01/img_8252.jpg

/home/wpcom/public_html/wp-content/blogs.dir/69d/45502932/files/2015/01/img_8251.jpg

/home/wpcom/public_html/wp-content/blogs.dir/69d/45502932/files/2015/01/img_8253.jpg

~ BLUSH, GLOW AND SET ~

For my blush I use MAC’s Mineralize Blush the shade Warm Soul as it’s a mid tone beige colour with gold pearl in it. Tried to find this on the Australian MAC website but for some reason it’s not there, yet I know for a fact that you can buy in store. To apply this is I take a clean MAC 168 Large Angled Contour Brush. To help add a little more glow to my skin I take my Hourglass Ambient Lighting powder in the shade Luminous Light and my Sigma F35 Tapered Highlighter Brush and place it under my eyes where I highlighted earlier with my concealer. I then take The Multitasker by Hair and Makeup Addiction Finishing and Mary-Lou Manizer by The Balm and highlight the bridge of my nose and a little into my forehead. To finish it off and set my face I take MAC’s Fix Plus Spray and spritz my face a few times all over, let that dry – ANNNNNNNND… BAM I’M READY TO GO! Hahaha!

/home/wpcom/public_html/wp-content/blogs.dir/69d/45502932/files/2015/01/img_8254.jpg

/home/wpcom/public_html/wp-content/blogs.dir/69d/45502932/files/2015/01/img_8259.jpg

Ok so there you have it, that is my full faced, every day foundation routine. Pretty easy I think, so hope you like and if you have any questions or comments I would love to hear from you.

Much love, till next time xoxo

Bronzed Glow like J Lo

HEYA!

So I don’t know about you but I have major girl crush on J Lo (still love calling her that) – how could I not – her style, figure, personality and her flawless face. So if you want to see how I did this – read on…

… E  Y  E  S …

~ STEP 1 ~

First I start off by priming my eyes as always with my Shadow Insurance by Too Faced and then with MAC’s Paint Pot in Soft Ochre. Setting this with a mixture of Beaches and Cream and Peach Smoothie both by Makeup Geek all over my lid and up to my brow bone. Then, taking Soft Brown by MAC on my Sigma E40 Tapered Blending Brush I blend this into my crease and just above as this will be my transition colour.

/home/wpcom/public_html/wp-content/blogs.dir/69d/45502932/files/2015/01/img_8090.jpg

~ STEP 2 ~

To darken up my crease further, I take Texture by MAC on an Sigma E25 Blending Brush and blend that into my crease. Repeating until it is as dark as I want it to be.

/home/wpcom/public_html/wp-content/blogs.dir/69d/45502932/files/2015/01/img_8095.jpg

~ STEP 3 ~

Taking Cocoa Bear by Makeup Geek I apply it to my outer V and blend into my crease with my Sigma E45 Small Tapered Blending Brush and again repeating until it is as dark as I want.

/home/wpcom/public_html/wp-content/blogs.dir/69d/45502932/files/2015/01/img_8097.jpg

~STEP 4~

Taking Tan Pigment by MAC and apply on my lids using my MAC 242 Shader Brush to blend it out till it becomes a nice glow.

/home/wpcom/public_html/wp-content/blogs.dir/69d/45502932/files/2015/01/img_8096.jpg

/home/wpcom/public_html/wp-content/blogs.dir/69d/45502932/files/2015/01/img_8098.jpg

~STEP 5~

Now you could stop here but I wanted to make it a touch darker. So, taking Embark by MAC I apply that to the outer V with my Sigma E45 Small Tapered Blending Brush and blend it directly to my outer V keeping extending it out to help enlarge the eye.

/home/wpcom/public_html/wp-content/blogs.dir/69d/45502932/files/2015/01/img_8099.jpg

~ STEP 6 ~

Here I curl my lashes using my MAC Full Lash Curler and then coat my lashes with a combination of In Extreme Dimension Lash by MAC and Bobbi Brown Smokey Eye Mascara. Let that dry for a few minutes. Again, you could also stop here or you could apply some false lashes. I chose to go ahead and apply No. 43 lashes by MAC wtih DUO Adheasive. While that is drying I apply a light coat of Cocoa Bear by Makeup Geek under my lower lashe line and heavily coat my lower lashes with Bobbi Brown Smokey Eye Mascara and TADAAAA! My eyes are done! Now onto the base…/home/wpcom/public_html/wp-content/blogs.dir/69d/45502932/files/2015/01/img_8100.jpg

/home/wpcom/public_html/wp-content/blogs.dir/69d/45502932/files/2015/01/img_8156.jpg

… F  A  C  E  …

For me this is the REAL feature of this look. I really wanted to emulate J Lo’s bronzed glowing skin. So here is what I did and used to achieve that.

~ STEP 1 ~

As my skin is on the dry side I start by priming my face with Embryolisse 24 Hour Miracle Cream, and Bobbi Brown’s Hydrating Face Cream. I Let that sink in for about 5 minutes and then finish priming my face by applying Hourglass’s Veil Mineral Primer and then apply my favourite illuminizer, MAC’s Strobe Cream.

~ STEP 2 ~

Taking my new favourite liquid foundation by Make Up Store in the colour Honey and mixing in their TO DIE FOR Illuminizer. It doesn’t say what the shade is but as you can see from the pic below it is a bronzed shade and I’m fairly certain its the only one they have. It also doesn’t appear to be on their site however they said that if you contact the store directly then they can make arrangements to ship to you. Click here for the store closes to you. So, taking about 2 pumps of the foundation and a small pump of the illuminizer and mix it together and apply all over my face with my trusty Beauty Blender.

/home/wpcom/public_html/wp-content/blogs.dir/69d/45502932/files/2015/01/img_8155.jpg

~ STEP 3 ~

Taking my holy grail concealer – Radiant Creamy Concealer by NARS in the shade Honey and place this directly under my eyes. Taking the same concealer in the colour Ginger I place this just under my eyes and then taking the same concealer but in the shade Ginger I apply that in an upside down triangle shape under my eyes, down the bridge of my nose and up to my forehead and a little on my chin. Taking my Beauty Blender I blend all that out. To set this I use Chanel’s Le Blanc Fresh Glow Loose Brightening Powder.

~ STEP 4 ~

Taking another Make Up Store product, their Micronized Compact Powder in Latte and set my foundation. I don’t like to use a lot of powder as I am naturally dry and I want this to be a particularly dewy look. So I usually prefer to apply this with a big fluffy face brush and pat that over where it’s needed. To contour my face I use Too Faced Sun Bunny Bronzer with my MAC 168 Large Angled Contour Brush – I like this bronzer for this look as it helps add a further glow and bronzed look to the skin.

~ STEP 5  ~

For my blush I use MAC Mineralize Blush the shade Love Joy as it’s a warm mid tone brown shade with gold pearl in it. I tried to find this on the Australian MAC website but for some reason it’s not there anymore yet I know for a fact that you can buy in in store. Taking my Hourglass Ambient Lighting powder in the shade Luminous Light and my Sigma F35 Tapered Highlighter Brush and place that where I highlighted earlier with my concealer. Finishing off by setting my face using Make Up Store’s Face Mist Spray which can actually double up as a prepping agent for your skin or to set your makeup. Like I mentioned earlier this doesn’t appear on their site but if you check the store locator for the closest one to you they will ship to you.

/home/wpcom/public_html/wp-content/blogs.dir/69d/45502932/files/2015/01/img_7511.jpg

And I’m done!

So, that is my take on J Lo’s bronzed summer glow. What do you think? Let me know, I would love to hear from you…

Till next time xoxo


Tis the season to be jolly…

Hey my loves!

I know its been a while since I last posted but there has been a lot happening – I moved house, left my job and am currently deciding on what exactly my future holds for me – career wise. So yes, the head has been a little full of other less creative things. However, someone who I care about mentioned to me he hadn’t seen me post much lately about my makeup business or anything on my blog and that in fact miss seeing me be excited about it – and you know what? I agreed 100%. So having that one simple conversation really revved my creative juices up and… I’m back baby! OH YEAH!

So here we go… As we all know its coming up to the “silly season” where we are all getting invitations thrown at us left right and centre. I know we all have our go to looks, but in my opinion now is the time to try adding a pop of colour you might not have worn before, slapping on a bold lip – or dare I say it… adding some glitter? Just promise me you wont do all three 😉 Over the next couple of weeks I’ll post various different looks and hopefully you can get some inspiration from them and replicate it or make it your own.

I was recently given (very generously) as a farewell present from my old work, one set from the Objects of Affection Holiday Collection by MAC Cosmetics. It is the Silver + Blue + Pigments + Glitter colours. So using one of my new pigments from this range in combination with some other MAC eyeshadow’s… here is the look I came up with. This is perfect for any night-time event/Xmas party.

~ STEP 1 ~

As aways we prime the eye… I am using a combination of Too Faced Shadow Insurance with MAC’s Paintpot in Painterly over the top. This combination is my go to for me AND all my clients. The Shadow Insurance helps prevent that nasty creasing you get if, like me, you have hooded eyes and Painterly helps block out any veins you might see on your lid and gives you a clean canvas to work with. Next taking a big fluffy blending brush, I like to use my Sigma E40 Tapered Blending Brush and I take a mixture of Peach Smoothie and Beaches and Cream by Makeup Geek and blend that all over my lid and up to my brow bone.

IMG_7477.JPG

~ STEP 2 ~

Taking my Sigma E25 Blending Brush and a mixture of the shades Creme Brulee by Makeup Geek and Bamboo by MAC I place it directly into my crease blending upwards (until it is seemless) as this will be our transition shade.

IMG_7478.JPG

~ STEP 3 ~

To darken my crease, and add some dimension I take the shade Handwritten by MAC and my Sigma E45 Small Tapered Blending Brush and place this directly into my crease and blending till there are no harsh lines. By placing a dark shade here and bending into the earlier placed colours it will make the transition of the dark colour we are going to use next much easier.

IMG_7479.JPG

~ STEP 4 ~

Now, here is my favourite part… the pigment. As I mentioned earlier I got some new pigments from the Holiday Collection, so from that set I am taking the colour Deep Blue Green. The photos do not do this colour justice. It reminds me of MAC’s Blue Brown Pigment, in that it isn’t just one shade, in different lights it look quite green, or blue or beautiful mixture of both. Anyway, here I used my Sigma F70 Concealer Brush to pack it on strong all over my lid in small patting motions so as to keep the colour intense rather than blending it out. Make sure you don’t take this colour up into the crease as we want to keep the transition of colours we placed earlier smooth and visible otherwise you will simply look like Uncle Fester.

IMG_7480.JPG

~ STEP 5 ~

Then taking that same E45 Small Tapered Blending Brush simply blend the crease shade and the top of where the pigment was place and the two will blend together seemlessly. Now you need to curl your lashes (or not if you don’t want to) and apply your mascara. Here i am actually using a combination of MAC’s Extreme Dimension Lash in Black Extreme and Bobbi Brown’s Smokey Eye Mascara in Black.

IMG_7543.JPG

~ STEP 6 ~

After I’ve applied my foundation and the rest of my face makeup I take my MAC 214 Short Shader Brush and apply Cocoa Bear by Makeup Geek along my lower lash line – using a clean MAC 239 Eye Shader Brush to blend it out.  Taking Deep Blue Green Pigment again and my Liner brush by Hair and Makeup Addiction I use my Fix Plus spray to help intensify the colour and carefully line right underneath my lower lash line.

IMG_7544.JPG

~ STEP 7 ~

To brighten up my inner corner I use another pigment from the collection called White. I apply this with my Detailer brush (from the Special Eyes Kit) by Hair and Makeup Addiction and place it directly in the inner corners of my eyes blending it out using my Sigma E36 Blending Brush.

IMG_7545.JPG

~ TO FINISH ~

I applied a generous coat of mascara to my bottom lashes and hey presto, you’re ready to go and show off those peepers… You could always add some falsies if you wanted too but I don’t like to wear them too much.

IMG_7472.JPG

IMG_7473.JPG

So tell me, what did you think of this look? Would you be game to show this off at your next Holiday party?

Till next time

xoxo

Smoked Out Plum

Hey my loves!

Here is the tutorial from a look I posted on my instagram about a week ago (sorry its a bit late). Summer is on its way for us in Australia and while this might seem like more of a fall type look I believe you can wear it in summer and/or winter. I don’t know about you by for me personally I dont really like to let the season determine what makeup I wear or don’t wear.

So I hope you like this, and read on for more details…

~ STEP 1 ~

As always, I start off by priming my eyes with my trusty Shadow Insurance by Too Faced. Taking MAC Cosmetics Paint Pot in Painterly I apply that on my lid and blending up to my brown bone. Then taking Salted Caramel from the Chocolate Bar Palette by Too Faced and mixing it with a touch of Red Brick by MAC Cosmetics I blend that into and just above my crease – this will be my transition shade and really help to blend and smoke out the darker colour.

image

~ STEP 2 ~

Taking Sketch by MAC Cosmetics I use a small flat shader brush to really pack that colour onto my lid and up into my crease. I go over this a few times to really intensify the colour.

image

~ STEP 3 ~

Taking a small tapered blending brush I take my transition shade combination and place that directly into the crease to help smoke out my crease line and making it seamless. I then go back in with Sketch and make the lid more intense.

image~ STEP 4 ~

Going over my crease and transition shades with a big fluffy brush I make sure that all lines are blended out smoothly.

image

~ STEP 5 ~

Taking a small concealer brush I take the pigment Utopia by Makeup Geek and apply it wet (I used MAC Cosmetics Fix Plus Spray) and carefully place it directly into the centre of my lid. I softly blend out the edges into the shadow. This gives the lid a glowing effect.

image

~ STEP 6 ~

As this is a slightly smokey look I don’t want to apply any liner – I will however, be applying some false lashes. For this look I’ve shown you two options:

  1. Flutter Lashes in Chantelle (one of my all time favourite styles)
  2. Ardell Lashes in no. 120 Demi Wispies (love how these flair out at the ends)
image

Ardell 120 Wispies

Once they are on and the glue is dried… I then apply my foundation, powder, contour etc.

To finish off the look I line my lower lash line with Salted Caramel from the Chocolate Bar Palette by Too Faced and mixing it with a touch of Red Brick by MAC Cosmetics. Taking a small detail brush I apply a touch of sketch really close to my lashline to help make this a really smokey look… And there you have it! ALL DONE!

image

Flutter Lashes – Chantelle

image

Flutter Lashes – Chantelle

So what do you think? Would you like to see more looks like this?  I hope you’ll stay tuned for some HALLOWEEN LOOKS!

Thanks for stopping by and if you create this look – be sure to load it on instagram and use the hashtag – #makeupbykrystleg

Till next time loves xoxo

A Little Party Never Killed Nobody… Part 1

  party

So it was my gorgeous friend Ellie’s hens party this Saturday just gone, and her best friend, now also now a dear friend of mine, planned the whole thing herself and it was awesome – so much fun was had by all. The theme was Great Gatsby/1920’s Flapper and all the girls that went really got into it which was great – some went the traditional route, but not me… I chose to put my own spin on it – naturally 😉 So if you’ve been invited to go to one of these type of themed parties and are looking for something a little different and “non-traditional” then read on to see what I came up.

~ MAKEUP ~

The roaring ’20s were both extremely racy and dramatic. With harsh make-up and short bobbed hair, the ladies of the 1920s were set to make an immense impression upon the world, and upon the history of beauty. According to my research (thank you Google ;)) Make-up was scarce during WWI, but the end of the war and the economic boom of many western countries, resulted in a decadent decade of dressing up, dancing and partying. So I perused some different options and came up with the following inspiration of both modern and traditional:

20140804-112142-40902343.jpg

As you can see the women of the 1920’s embraced the bold eye and bold lip and paired them together. So if you’re interested to see what i came up with and how I did it… READ ON 🙂

~ STEP 1 ~

As I am going to be using bold shades and i want them to last without creasing i am going to need a strong eyeshadow primer/base that also acts as a blank canvas. Here I am using Urban Decay’s Eyeshadow Primer Potion in Eden. I take a small amount (which goes a long way with this product) and place that all over my lid using my Sigma  P80 brush and blend that all over my lid and up to my brow bone. Taking a neutral shade, I blend that all over my lid and up to my brow bone – I used Blanc Type by MAC Cosmetics – This just sets the primer and will make it easier to blend the dark shades I plan to use.

20140804-105527-39327910.jpg

20140804-105528-39328072.jpg

~ STEP 2 ~

I take a warm neutral shade, for my transition colour and place that above my crease – blending it back and forth in a windscreen wiper motions (I chose to go with a mixture of Beaches and Cream with Creme Brûlée both by Makeup Geek). Next I take the light baby pink shade from my Eyes on the 60s palette by BH Cosmetics and using my go to blending brushe, E35 Tapered Blending brush by Sigma and blend that just beneath where I placed my transition shade – using windscreen wiper motions to blend it out thoroughly. As this was to be a very dramatic look I went back in a few times and added more of the baby pink colour till I was happy with the intensity of it.

20140804-112513-41113964.jpg

baby pink_eyesonthe60s

20140804-112514-41114114.jpg

~ STEP 3 ~

To further intensify this look I chose to go for a red shade, yes I said RED! LOL!  Taking my Crease Brush by Hair and Makeup Addiction and the red shade from the same Eyes on the 60s palette and place that directly into my crease blending it upwards and smoothly into my transition shade. I keep adding to it until I am happy with the intensity of it.

red_eyesonthe60s

20140804-144951-53391207.jpg

~ STEP 4 ~

After I am happy with the placement of the red shade, I take my NYX Jumbo Pencil in Gold and place that all over my lid, being careful to not take that into my crease. After that I blend out the colour with my finger till it is nice and smooth.

20140804-145041-53441957.jpg

~ STEP 5 ~

Taking a mixture of the light warm brown and the darker brown from the Eyes on the 60s palette I place that over the top of where I put the Gold Jumbo Eye Pencil. I then blend that out and redefine my crease with a clean E45 Small Tapered Blending brush by Sigma. I also take more of the darker shade and concentrate that in my outer V.

browns_eyesonthe60s

20140804-150512-54312408.jpg

20140804-150545-54345376.jpg

~ STEP 6 ~

Next I take Utopia by Makeup Geek (this pigment is AMAZING) and pack it on with my finger – once I am satisfied, I take my Eye Pencil in Black Moon by NARS and line my upper lash line and then smudge it out with my E65 Small Angle brush by Sigma till it has a more smoked out less harsh look. Before I clean up and finish off the look, I got over my transition colour to make sure the red stands out nicely. I also add a bit more of Utopia as I want it really sparkly.

20140804-160820-58100228.jpg

20140804-160820-58100392.jpg

~ FINALE ~

Taking a baby wipe I remove all the fall out from my shadows and pigment – making sure the area is nice and clean ready for foundation. Here I complete my look by curling my lashes using my favourite lash curler by MAC Cosmetics and then apply a couple of coats of Smokey Eye Mascara by Bobbi Brown and Le Volume de Chanel Mascara. Once that has set, I then apply my false lashes (I told you this was an intense look!). The ones I chose are called Girl, You Craazy! by Velour Lashes. I love this brand… you can honestly wear them (provided you take care of them) at least 20 times before having to get a new pair. I actually stop and ask me where I’d got them from. Once they are on and all set, I then take some of the red shade mixed with the dark brown shade from the Eyes on the 60s palette and blend that under my lower lash line with my E21 Small Smudge brush by Sigma and really smoke it out. I apply some the Smokey Eye Mascara by Bobbi Brown on my lower lashes and line my water line with the same Black Moon Eye Pencil by NARS and there you have it! The eyes are done! I then of course applied all my foundation and blush etc. I have also created a little video if you want to check that out also – its fairly basic but you at least you can get an idea of what I’ve been talking about in the steps above…

20140804-161353-58433827.jpg

20140804-161354-58434138.jpg

20140804-161353-58433982.jpg

So I hope you enjoyed this very different and somewhat intense look. I did actually choose to pair this with the Rebel Lipstick by MAC Cosmetics but I forgot to photograph it… SILLY ME! Would love to hear what you think … Next post will be on my hair and how I styled it for this look.

Till next time XOXO

Everyone loves a quickie…

I think we’ve all been there… waking up to the sound of your alarm only to realize you hit that snooze one too many times, and now you’re running uber late; maybe you’ve been up all night, sick; realising that extra glass of pinot you had last night wasn’t the best decision, and you now look how you feel – rubbish; whatever the case here is a quick 10 minute makeup routine to help save time and get you out the door looking your usual fine self 😉

~ PREPPING & PRIMING ~

This is the first step, apply your daily moisturizer – here I use a combination of Embryolisse and Bobbi Brown’s Hydrating Face Cream. Once that has settled in, I then like to apply a small amount of MAC’s Strobe Cream as an illuminator for under my foundation. I love this product because I find that it can really helps to refresh and boost the look of dull, flat or tired-looking skin. It also contains iridescent particles to brighten and clarify skin more so that if you just used foundation on its own.

~ FOUNDATION ~ 

For this routine I choose to use a Bobbi Brown’s BB Cream in Medium. Why BB Cream? Traditionally BB creams (Beauty Balm Cream) are known for their all-in-one approach. Each brand will have their own formula, but most are designed to do everything from healing acne to minimizing wrinkles and dark spots. As far as coverage goes I find they fall somewhere between tinted moisturizer and foundation. Personally I love using BB creams as I find they can give me quite a dewy, airbrushed look – perfect for days when you want little coverage or you don’t have the time to devote to looking too “made up”. Here I apply a small amount and really work on buffing it into my skin using my Real Techniques Buffing Brush.

~ CONCEALER ~

Using my trusty Corrector in Light to Medium Peach by Bobbi Brown, using my finger I place it under my eye to help cancel out my dark circles. Taking NARS Radiant Creamy Concealer in Ginger I place it in a triangle shape under my eyes and use my Beauty Blender to help blend it out evenly.

~ BLUSH AND POWDER ~

To set my face I apply a very light dusting of Chanel Natural Loose Powder in 20 Claire with my Real Techniques Blush Brush. Using my Sigma F10 brush I apply MAC’s Mineralize Blush in Warm Soul to my cheeks and blend it up into my temples and forehead to help warm up my complexion.

~ HIGHLIGHT & FINISH~

Taking my Multitasker brush by Hair and Makeup Addiction I apply my fave highlighter – Mary-Lou Manizer by The Balm down the bridge of my nose, the high points of my cheek bones and a little under my eyes and forehead. I also apply a quick coat of mascara, comb my brows and out the door I go!

So there you have it, I’ve compiled a quick video showing how I do all this, if you’d like to check it out you can click on the link below:

TILL NEXT TIME

xoxo

Smoke and Glitter

Today’s tutorial is on a look I came up with that can go from day to night, and has a slight smoked out effect. I feel this will fast become one of my go to day to night smokey looks. It definitely makes blue and green eyes pop! So if you’d like to see how I completed this look READ ON!

~ COLOURS USED ~

Todays look I’ve used all shadows by Makeup Geek and a pressed pigment by MAC Cosmetics called Day Gleam.

20140611-101003-36603928.jpg

20140611-123353-45233688.jpg

~ STEP 1 ~

As always, I start off by priming my eyes with my trusty Shadow Insurance by Too Faced. Then taking the colour Beaches & Cream I using my big fluffy blending brush (E35) I blend that into my crease and all over my lid and all the way up to my brow bone. Taking more of that same colour I concentrate it into the crease and keep blending till I am happy with the colour.

20140611-102240-37360407.jpg

~ STEP 2 ~

Taking the colour Nearly Naked I use a slightly less fluffy blending brush (E25) for more precise shadow placement, and blend that out into my crease and just above. I go in a few times to darken and smoke out the colour more.

20140611-104358-38638820.jpg

~ STEP 3 ~

As I want to really help make my eyes pop, I take the colour Cocoa Bear to deepen the crease further. Using the same brush I used before, I blend the colour out into my crease and onto my inner corner and outer V. With this step, you want to make sure you keep the centre of the lid free of colour – for now…

20140611-110042-39642455.jpg

~ STEP 4 ~

Taking a more precise blending brush (E45) I blend the all the colours together so there are no harsh lines or edges.  this helps to also keep the centre of the lid shadow free.

20140611-112518-41118323.jpg

~ STEP 5 ~

Taking the pressed pigment Day Gleam by MAC Cosmetics, I take my ring finger and lightly swirl it around picking up the colour with my finger and pressing it into the Centre of my lid.

20140611-112625-41185154.jpg

~ STEP 6 ~

Then taking a small crease blending brush (E47) I take the colour Mocha and darken up just the outer V and bring that into just my crease and blend it out. This will help to smoke out the look whilst adding some depth to it as well.

20140611-112659-41219994.jpg

~ STEP 7 ~

I go over the crease again with my big fluffy blending brush and go over the crease and ensure there are no harsh lines. As I want this look to be really smokey I decide not to use a liquid liner but rather an eye pencil (Long-Wear Eye Pencil in Mahogany by Bobbi Brown) and smudge it out using The Liner brush by Hair and Makeup Addiction.  I also decide to take more of Day Gleam and place it into the centre of my lid and right into my inner corner.

20140611-115945-43185036.jpg

~ STEP 8 ~

I curl my lashes with MAC Cosmetics Full Lash Curler and then apply a couple of coats of Smokey Eye Mascara by Bobbi brown (am really loving this at the moment) and finish off my under eye by taking the same eye pencil I used earlier and smudging it with the same liner brush under my whole waterline and then lining my waterline with it. Going over the top of the liner with the colour Cocoa Bear and coating my lower lashes with the same Smokey Eye Mascara.

20140611-120102-43262727.jpg

FINISHED …

So here you have the finished look. You chould choose to add false lashes if you wish but I just chose to go au natural-ish and just stick with mascara.

20140611-122045-44445367.jpg

20140611-122117-44477550.jpg

20140611-122255-44575140.jpg

Hope you like this one – let me know what you think or if you try it for yourself…

Till next time XOXO

30 Days of Beauty – Part 3

So here we have it! The final part of my 30 Day Beauty Challenge.

~ DAY 21 ~

…Before & After…

So here is my before – without without makeup or hair done. All I’ve done here is primed my face with Embryolisse Lait-Crème Concentrè and my Egg Pore Silky Smooth Balm by Tony Moly then primed my eyes using Shadow Insurance by Too Faced.

20140604-101348-36828668.jpg

And here is my after – details are as follows:

Face: Foundation is Studio Sculpt by MAC Cosmetics with Bobbi Brown’s Corrector and Radiant Creamy Concealer by NARS – applied and blended with a Beauty Blender (I get mine from ModelRock Lashes)

Cheeks: Blush – Hot Mama by The Balm

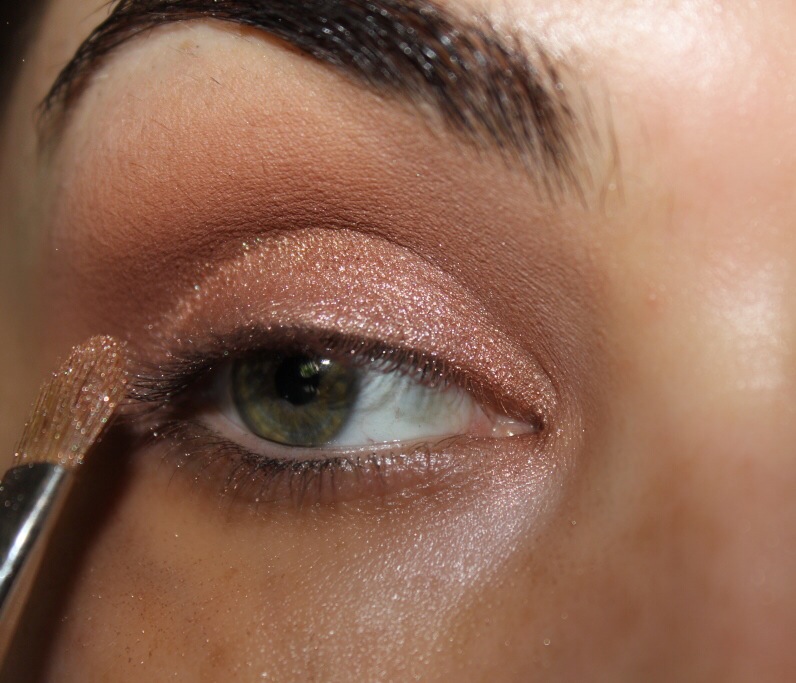
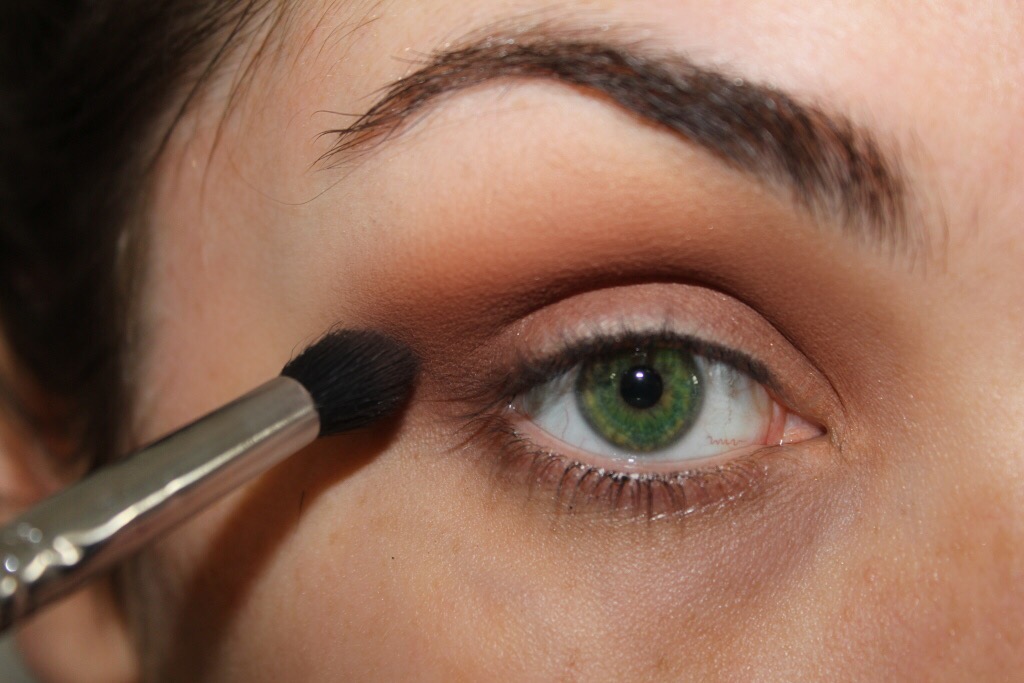
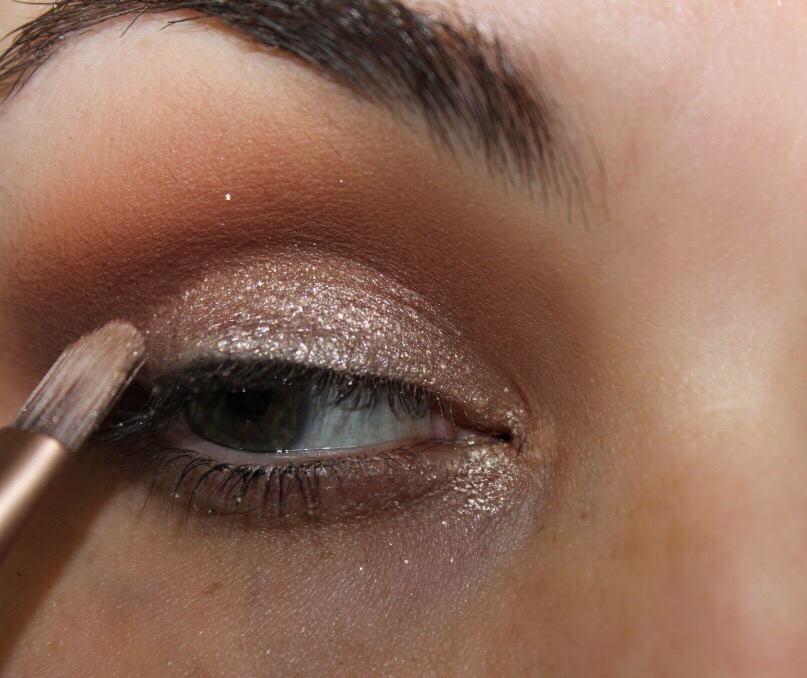
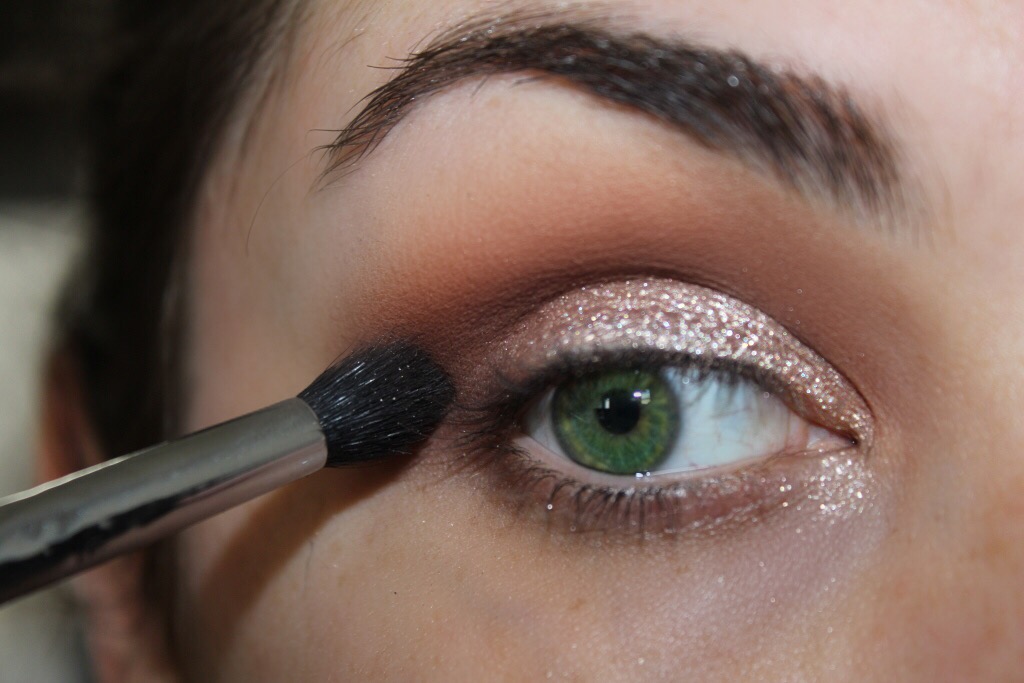
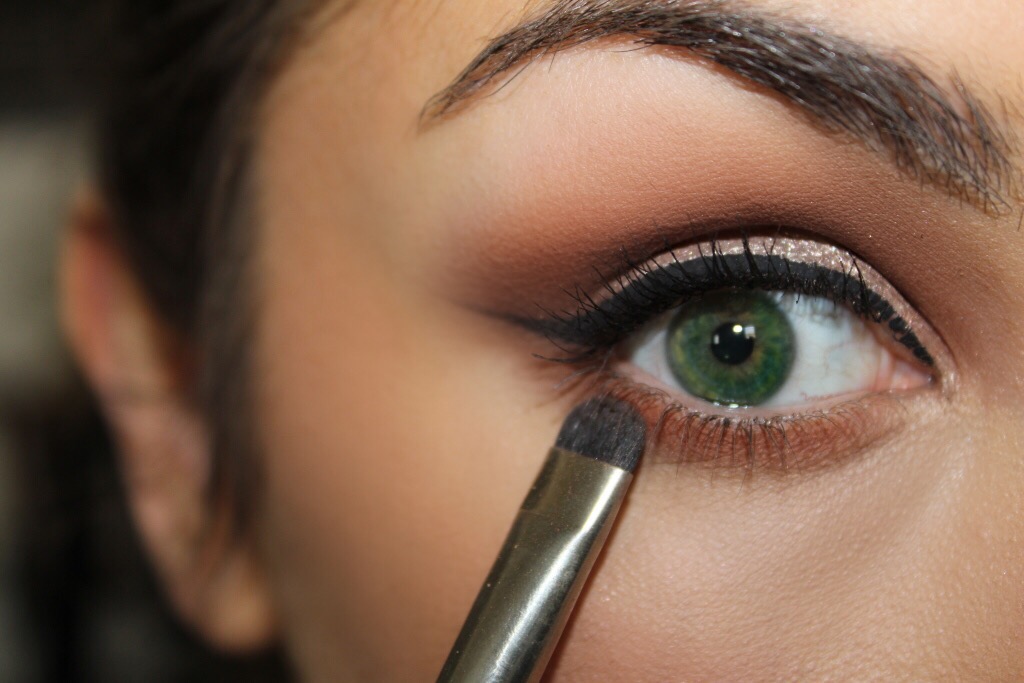
Eyes: In the crease I have Crème Brûlée and Cocoa Bear both by Makeup Geek on my brow bone is a mix of Vanilla Bean and Beaches & Cream again both by Makeup Geek. On my lid I have Honey Honey and Crisp Apple Strudel from the “A Few of My Favourite Things Palette” by Too Faced (was limited edition and I think its sold out now) then lining my lid into a cat eye flick with Schwing Liquid Liner by The Balm and a few coats of Goddess Mascara by Eye of Horus Mascara topping them with No. 1 lashes by Lashes in a Box. On my lower lash line I have Long-Wear Cream Shadow Stick in Violet Plum by Bobbi Brown and Drama Queen by Makeup Geek over the top.

20140604-101736-37056931.jpg

~ DAY 22 ~

…Perfume…

What more could a girl need but sweet scents and champagne…

Chance by Chanel us my favourite scent for summer – I adore it. Its so fresh and crisp. when I put it on I feel happy and ready to take on the day. To me perfume is like your own personal theme song – it just finishes a whole look off right.

20140604-102247-37367947.jpg

~ DAY 23 ~

…Makeup Storage…

Come to mumma! Just ordered this bad boy – the final piece in my makeup storage collection. Its a freestanding case that comes complete with its own lights, mirror, and electrical outlet! It has ample room for my makeup supplies also! I got it from the Makeup Artist Network – they also have loads of other storage items – check ’em out.

20140604-103731-38251115.jpg

~ DAY 24 ~

…Runway Inspired…

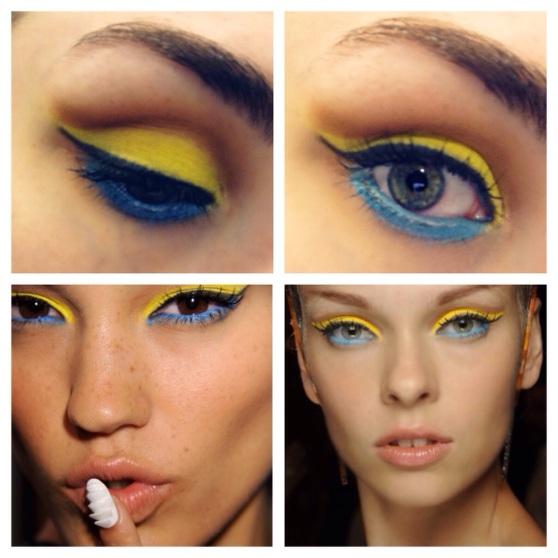
I was looking through photos of the makeup from NYFW 2014 and there were so many great looks – but the look that The Blondes had designed for them by MAC Cosmetics lead makeup artist Kabuki caught my eye. I loved everything about it – such a crisp simple look but it really catches your eye. So I tried to mimic the yellow and aqua blue winged liner – products and details are below:

Jumbo Eye Pencil in Milk by NYX Cosmetics all over my lid and drew it out into a cat eye flick using my Liner Brush by Hair and Makeup Addiction to get the shape right. Taking a bright sunny yellow shade from my 252 Ultimate Palette by Coastal Scents, I pack that on with the same liner brush, all over my lid. Using Texture by MAC Cosmetics I place that above the yellow shadow. Lining my lower lash line with the same Jumbo Eye Pencil by NYX – then taking a light sky blue shade from the same 252 Ultimate Palette and packing that over the top of where I placed the Jumbo Eye Pencil. Finishing the look off I line my lash line in a small cat eye flight with my Eyestudio Long Lasting Drama Gel Eyeliner in black by Maybelline and coated my lashes with Le Volume De Chanel Mascara.

20140604-104523-38723854.jpg

~ DAY 25~

… Celebrity Inspired…

Today I took inspiration from my all time she rocks the smokey eye well… So here is my take on it, details are below:

Primed my eye with Shadow Insurance by Too Faced then used a mixture of my Jumbo Eye Pencil in Dark Brown by NYX Cosmetics and Dash Eyeshadow Base by Sigma blended together as a base for the darker shadows. On the outer V is Mocha, above the crease is a combination of Brown Sugar and Country Girl all by Makeup Geek on my inner lid is a combination of Honey Honey and Buche De Noel from the “A Few of My Favourite Things Palette” by Too Faced (was limited edition and I’m pretty sure it’s sold out now). Taking my Long-Wear Eye Pencil in Jet by Bobbi Brown I tightline my upper and lower lash lines – smudging out the top liner. Finishing off with 2 coats of Le Volume De Chanel Mascara

20140604-105821-39501761.jpg

~ DAY 26~

… Favourite Era…

Is the 50s by far! During the 50s, beauty trends reached a completely new level and women everywhere participated by utilizing revolutionary new colors, products and techniques. It’s also where my favourite technique – cat eye flick – really came about. See below for the deets: ️

Primed my eyes with Shadow Insurance by Too Faced, placed Blanc Type by MAC Cosmetics over my lid and all up to my brow bone. In the crease I have a mixture of Haux, Malt and Kid – all by MAC Cosmetics. For my cat eye flick I used my favourite liquid liner – Schwing Liquid Liner by The Balm and finished it off by applying a couple of coats of Le Volume De Chanel Mascara on my top and bottom lashes. On my lips is En-Joystick in Retro Red by Kardashian Beauty.

20140604-105136-39096220.jpg

~ DAY 27~

… Face Mask/Scrub…

I have tried a lot of face cleansers and scrubs but of all the products Michael Todd True Organics are the best! I take my skin care routine very seriously – I already use the Tropical Fruit Scrub and now since adding this – Wild Berry Exfoliating Peel – into the mix my face has never felt better. It is so smooth and the best part… they are made with all natural ingredients and do not test on animals!! Plus this peel smells DIVINE – much like strawberry jam!!! I would highly recommend giving these a try! I doubt you’ll regret it!

20140604-110116-39676225.jpg

~ DAY 28~

…Wish List…

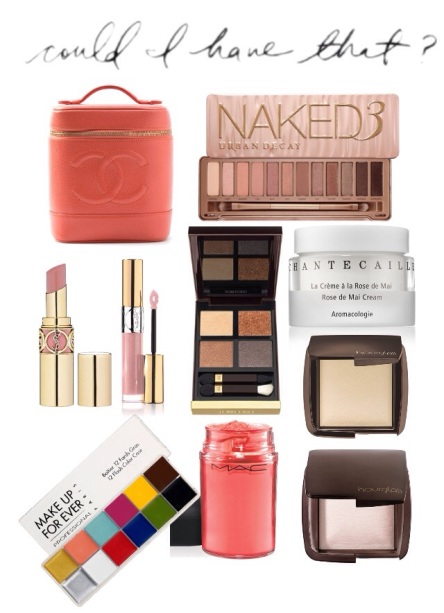
So I compiled a little collage of some of the things that are on my wish list for my up coming trip to the US… ️Details️:

Chanel Vintage Vanity Case, Naked 3 Palette by Urban Decay, Chantecaille Rose De Mai Cream, Tom Ford Eyeshadow Quad in Cognac Sable, YSL Rouge Volupté Lipstick in Nude Beige, YSL Gloss Volupté in 101 Iridescent, Makeup Forever 12 Flash Colour Case, Neo-orange pigment from the Playland Collection by MAC Cosmetics, Hourglass Cosmetics Ambient Lighting Powder in Diffused Light & Ethereal Light.

20140604-110346-39826125.jpg

~ DAY 29~

…Favourite High End Products…

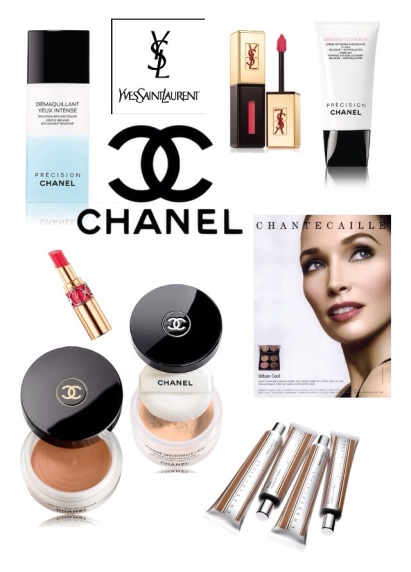
This is a collection of my current favourite high end products from my kit.️ Details:

Chanel Precision Gentle Eye Makeup Remover – hands down the best eyemakeup remover on the market, it gets everything off & it doesn’t leave your eyes feeling dry or over oiled. YSL Glossy Stain in Dangerous Pinktalk about a long lasting gloss, perfect for brides & bridesmaids. Chanel Precision Mousse Douceur Rinse Off Foaming Cleanser – this is so luxurious, it makes my skin feel like it’s been to a spa & had a facial without me having to actually leave the house! YSL Rouge Volupté lipstick in no. 38 – this is the perfect summer colour and it has surprising staying power and leaves your lips feeling well moisturized. Chanel Soleil Tan De Chanel Bronzing Makeup Base – this Bronzer leaves my skin with the most natural sun bathed look, I wear it on it’s own in summer or under my foundation for a more bronzed look – either way it’s completely easy to use the perfect bronzer in my opinion. Chanel Natural Loose Finish Powder in 20 Claire – this is the perfect setting powder as it’s so fine! It helps me set my makeup while allowing my skin to hold a dewy finish – a little goes a long way with this product. Chantecaille Radiance Gel Bronzer – this is another great bronzer – I prefer to use this one for over the top of my foundation as it seems to sit better that way.

20140604-110514-39914468.jpg

~ DAY 30~

…Brights

Today’s look I added a pop of lime green… What do you think? Products and details are as follows:

Primed my eyes with Shadow Insurance by Too Faced, then using my Jumbo Eye Pencil in Milk by NYX Cosmeticsnot into the crease. Then taking a bright neon green shade from my 252 Ultimate Palette by Coastal Scents and pack that all over the lid. Taking Texture by MAC Cosmetics I place that into and above my crease, darkening up the crease and my outer V with Mocha by Makeup Geek. I use that same colour and line my lower lash line as well. Using Schwing Liquid Liner by The Balm to line my lid and out into a cat eye flick. Finishing off with a couple of coats of Le Volume De Chanel Mascara – and there you have it! A subtle pop of green for a little fun!

20140604-104045-38445793.jpg


Well that’s it my friends, I hope you liked this for something different and stay tuned for my next post…

Till next time xoxo