Everyday Sparkle

Hi loves,

It has been forever and a day since I was last on here… Please forgive me – Ive had a lot going on in my life such as moving house, not once but twice, starting a new job, leaving that job and now starting a new one. So… I’ll stop waffling on and get right into my next tutorial…

I dont know about you but I love anything sparkly… So I try to incorporate it into as much of my makeup looks as possible which can be hard in the professional working environment 😉 so see below before a step by step on how to incorpate this into an every day look…

~ STEP 1 ~

You should always prime your eyes, but if you are using a shimmery shadow – you definitely need to prime! For this I turn to my trusty Shadow Insurance by Too Faced Cosmetics, then applying a thin layer of Soft Ochre Paint Pot by MAC Cosmetics – setting it with Blanc Type shadow also by MAC Cosmetics.


~STEP 2~

Taking Soft Brown by MAC Cosmetics and my Sigma E40 Tapered Blending Brush and blend that into and above my crease – this will be my base transition shade.

~STEP 3~

Using the colour Bandit by Colour Pop and my Sigma E35 Tapered Blending Brush I place this directly into the crease – further deepening the colour and getting that rusty brown colour I love.

~STEP 4~
To deepen the outer V and crease further and add a slight smokey effect – I take my E45 Small Tapered Blending Brush by Sigma, and the colour Embark by MAC Cosmetics and blend that into the outer V and partly the way into the crease, blending it out till there are no harsh lines.


~STEP 5~

Using my new favourite shadow – I Heart This by ColourPop, I first apply this using my fingers and pack it on – then taking a firm brush (I just used the one from my Urban Decay palette) I smooth out the colour I’ve placed on my lid, then taking a bit more on the same bush, I go over the top – to make it a bit more intense. Taking the same E45 Small Tapered Blending Brush I go over the outer V and some of the crease to ensure the smokey dark colour is prominent.


~FINISH~

To finish this look I line my lashes using Rimmel’s Glam Eyes Liquid Liner and creating a cat eye effect, together with a few coats my lashes with a few coats of my favourite mascara – Le Volume De Chanel. Apply my foundation (see my earlier post on how I do this here). Line my lower lashline with Bandit using my Sigma E20 Short Shader Brush and coating my bottom lashes with Le Volume De Chanel.


 While its not an overly complicated look, i think it has great impact mainly because of the gorgeous feature shade – I Heart This by ColourPop. So have a look and let me know what you think or if you give this a try at home.
Till next time xoxo

Valentines Day Look – No. 1

Hello my loves,

It’s hard to miss Valentine’s Day coming up, and whether you’re looking forward to being romantically spoilt by your man or are dreading the date with the strength of a thousand suns, you should look fabulous. Stock up on wine, get the boy or your single girlfriends around and recreate one of these looks so you look hot for the occasion. This is the first of the four Valentine’s styles I’ll be showing to you this week.

~STEP 1~

I primed my eye with my trusty Shadow Insurance by Too Faced. Then taking Blanc Type by MAC Cosmetics, I blended that all over my lid and up to my brown bone with my E35 Tapered Blending brush by Sigma.

photo 4

~STEP 2~

Taking Malt by MAC Cosmetics I use my E45 Small Tapered Blending brush by Sigma and place that in and just above my crease. Make sure this is blended out completely and there are no harsh lines. The idea is to create a soft shadow effect.

photo 5

~STEP 3~

As I want a little bit of shine to the lid I use a mixture of Shimma Shimma and Vanilla Bean by Makeup Geek and blend that all over the lid with the same E35 brush I used earlier. Then I take the E45 brush I used for my crease and go back over my crease to strengthen the colour.

photo 6

~STEP 4~

As I want to sharpen up my crease a little more, I take my E36 Blending brush (perfect for precise application to the crease)by Sigma and the shade Moondust by Makeup Geek and apply it using windscreen wiper motions, blending it directly into the crease.

photo 1

~STEP 5~

Then taking a baby wipe I quickly clean up under my eyes and then create a sharp line on the side of my eye (this is how I mark out where my liner will go).

photo 3

~STEP 6~

Now if you want you could leave the look as it is and just apply mascara and it would still look lovely. I however chose to add a cat eye flick. Now I understand that this isnt easy but the only way you can improve is to practice practice and then practice some more. I personally find it easiest to start by drawing a line across my upper lash line. So for todays look I wanted a more matt finish for my eyeliner so I went with my trusty fave – Schwing Liner by The Balm.

photo 2

~STEP 7~

Then I draw a line out to however far I want it and then take it back down and fill it in to my desired thickness. Excuse the poor quality of this liner today as my hands were a little shakey (I may or may not have had a few drinks the night before… dont judge me). Again this is personal preference but I like to take the same shadow I used in my crease and line the lower lash lne with it. So I took the colour Moondust again and lined my lower lashline and then finished off the look with a few coats of Goddess Mascara by Eye of Horus on top and bottom lashes… TA DAAAA!

photo 9

photo 12

~STEP 8 – optional~

So from here you could just put on some clear lip gloss, a nude or a coloured lipstick. I’ve shown the look below with a coloured lip. Here I am wearing Sheen Supreme lipstick in the shade Candy Apple:

valentines candy apple lip

Well I hope you liked this look, its a pretty simple look but I like it because it allows you to go from day to night and you can apply any lip colour you want. Depends on how daring you want to be 😉

Till next time xoxo

NEW YEARS DAY LOOK

Well firstly let me start off by saying HAPPY NEW YEAR babes! Hope you had a kick ass day and night 🙂 Ive seen a whole lot of glittery looks around for NYE but as I was going out for New Years Day, I wanted something a little different so read on below for a step by step tutorial

~ STEP 1 ~

photo 1

Prime your face and eyes. As I want my makeup to stay on all day and into the evening I need to make sure I’ve primed both my eyes and face so as to hold the makeup in place. For my face I used my Embryolisse 24Hr Miracle Cream and for my eyes I used my new my new Too Faced Shadow Insurance which I bought from the new Mecca Maxima shop at Warringah Mall).

~ STEP 2 ~

photo 2

Taking Creme Brulee by Makeup Geek – I use my E45 brush by Sigma and blend it into and just above my crease.

~ STEP 3 ~

photo 3

Using the same blending brush from before I take CocoaBear by Makeup Geek – blending over the top of where I placed Creme Brulee.

~ STEP 4 ~

photo 4

Taking a large fluffy brush I use a mixture of Vanilla Bean and Beaches and Cream and blend that up onto my brow bone.

~ STEP 5 ~

photo 5

From my “A Few of My Favourite Things Palette” by Too Faced I take the colours Honey Honey and Crisp Apple Strudel and place that on my lid with my MAC 217 brush – blending it out evenly over the whole lid. I bought this palette online from Tarazz – however any light golden shade will do.

~ STEP 6 ~

photo 6

I wanted to smoke out the look more so I took my Sigma E36 brush and used Mocha by Makeup Geek and placed it directly into my crease and my outer V.

~ STEP 7 ~

photo 7

I then wanted to add some sparkle so going back to my A Few Favorite Things palette I took Moon on Their Wings and just patted that on top using my MAC 217 Brush. Again you dont have to use this palette – you can either skip this step or choose a lighter golden sparkly shade or pigment.

~ STEP 8~

photo 8

I chose to go over again with Mocha and darken up my crease and outer V so as the golden shades would stand out more.

~ STEP 9 ~

Fotor0102213248

I then applied my favorite liquid liner – Schwing by theBalm and my mascara – I used Mega Plush and Colossol Volume – both by Maybelline.

~ STEP 10 ~

photo 11

Then taking my No. 1 lashes by Lashes in a Box – I applied them for extra flair. I then go on and apply my foundation and concealer.

~ STEP 11 ~

photo 13

~ STEP 12 ~

Taking Bobbi Brown’s Long-Wear Cream Shadow Stick in Violet Plum I ran it under my bottom lash line.

~ STEP 13 ~

photo 17

Using Drama Queen by Makeup Geek I use my MAC 217 brush and press it along where we placed Violet Plum. Cleaning up any fall out with some concealer.

photo 18

Finishing off by applying a few coats of Goddess Mascara by Eye of Horus along my lower lash line and of course brush my brows into place.

TA DAAAA….

Fotor01030321

Well I hope you liked this look – let me know what you think 🙂

Till next time babes xx

I LOVE GLITTER

HELLO MY LOVELIES!

I don’t know about you but this beautiful warm weather we are having has me all excited to create new spring summer looks with soft dewy skin. I love at this time of year to create looks that have minimal effort but maximum impact. Personally I like to embrace the warmer colours and keep it as natural as possible. One thing I do love to add is glitter/shimmer/pigments to my eyes to add for an easy way to jazz up a simple spring time to summer look. So read on for how I go about adding glitter to my eyes…

~ STEP 1 ~

Priming the eye is essential to help the eyeshadow colour you use to have something to hold onto. Here I chose to go with one of my two holy grail MAC primers – M.A.C’s Paint Pot in the colour Painterly and placed that all over my lid and up to my brow bone using my Sigma P80 brush.

primer

~ STEP 2 ~

Applying M.A.C’s eyeshadow in colour Jest all over my lid and Blanc Type underneath my brow with my Sigma E55 brush. Blending both out till they are seamless and blended without any harsh lines.

jest

 ~ STEP 3 ~

The taking my E45 brush by Sigma I blended M.A.C’s Cork and Haux into my crease and blended well and repeated until it was a dark as I wanted.

crease


~ STEP 4 ~

Here is where it can get a little fiddly… We want to apply the glitter and to ensure it stay on and doesn’t fall out as the day/night progresses, I then apply a small amount of lash glue over the top of my lid with my finger. Then, taking my M.A.C 242 brush I take some of the glitter (I used Glitter – White (Green Undertone by Bitch Slap Cosmetics) and pat it quickly across where I put the lash glue.

My advice is to tap out a little of the glitter you want to use on a tissue so you can dab it easily and reduces the mess made by accidental spilling of glitter containers or getting any glue into your container. Do one eye at a time and keep your eye closed until the glue and glitter are set. Then repeat on the other eye.

glitter


~ STEP 5 ~

Finish the look off by adding liner to the top lid if you want, it’s a personal preference really but personally I like it with liquid liner as I feel it finishes the eye off nicely and makes it look a little more dramatic gives it a sharper edge. Then coat the lashes with some mascara – as little or as much as you like – and if you want to add further flair you can apply a pair of false lashes. For my finished look I went with both – I used Rimmel’s Glam Eyes Professional Liquid Liner in black and topped it off with a coat of mascara and Lashes in a Box style no. 2

close up glitter eye

close up glitter eye 2


close up glitter eye 3.1


Thank you for reading and I would love to hear from you so if you have any comments, tips, advice, questions or anything please leave me a comment below – I would love to hear from you 🙂

Till next time xox

on a bad day


COLOURED RAINE

Hiya! I know its been a while since I’ve posted anything so sorry about that. Things have been rather hectic for me lately but its starting to settle down now – phew 😉

ANYWHO, I have done some MAJOR shopping as one does when things are in turmoil… so amongst the many things I bought (post on that coming soon) I decided to buy some lipsticks from Coloured Raine. I have seen lots of pictures on Instagram of girls featuring really different lip colours and combinations so after being inspired by @theamazingworldofj (username) and some of the colours she had worn and taken photos of I thought I would treat myself and my curiosity and order some.

~ About ~

Coloured Raine are a cruelty free makeup brand, available online. On their website you can find a range of products from bright lipsticks, bold shadows, multi use pigments & some crazy pretty glitters!

~ What I got ~

After much searching and research I decided on the following colours:

  • Monroe
  • Socialite
  • Penthouse Sweet
  • Lavender Raine
  • Fierce & Fab

coloured raine lipsticks

~ Swatches ~

… Monroe …

Monroe is a gorgeous bright fuschia colour. It is creamy in texture and glides on really well. It isn’t overly shiny however when applied it does have a nice sheen to it that isn’t too over the top.

TIP – This would look amazing paired with a simple cat eye and lashings of mascara.

monroe

… Socialite …

Socialite is a nude colour. Unlike other so-called nudes which leave you looking like you’re wearing foundation all over your lips, this one gives you a nude look while leaving your lips defined and with a touch of colour.

TIP – Paired with a smokey eye and it will look HOT! Be warned though, being highly pigmented and having a matt finish this lipstick is not kind to chapped or dry lips – so be warned 🙂

socialite

…Penthouse Sweet…

Penthouse Sweet is a light red/coral colour which like Socialite has a matt finish, so make sure you’ve given your lips some TLC with a lip scrub and some hydrating lip balm before applying.

TIP – Try teaming this colour with a soft bronze smokey eye  – talk about sizzling.

penthouse sweet

… Lavender Raine …

I know you are probably thinking – WHAAAT? PURPLE? I know it’s a rather different shade and I would guess it would be for most people. I don’t know why but I just absolutely LOVE this colour. This is also a matt finish but the pigmentation of this one is by far the best out of all the ones I bought. When I wear this I feel like I’m channelling my inner Nicki Minaj.

TIP – If you are bold enough to wear this I would suggest a simple eye to go with it. Go the subtle cat eye route or try a lightly dusting a pale shimmer shadow over the lid with a few coats of mascara.

lavender raine

… Fierce & Fab …

My last one is Fierce & Fab, a reddy orange colour which has a slight shiny finish to it similar to Monroe. 

TIP – Personally think this colour works well for day or night. Try wearing it with a simple cat eye for day or a warm cut crease look for night.

Fierce and fab

Please note the pictures take below is have not been edited in any way and so therefor the colours as they appear as they come out of the tube 🙂

~ My Opinion ~

Overall I’m quite impressed with the quality of the shades I bought – the lasting power for me is not that long but that’s due to my constant drinking and/or eating throughout the day 😉 They are $13 per tube (shipping for Australia I found quite reasonable) and for the pigmentation and amount you get I feel it’s more than reasonable – plus they comer really fun different colours 🙂  – the range is awesome.

So if you’re in the market for some new lipsticks or just want to try something new – I would highly recommend these – let me know if you end up buying some or if you already have some what are your thoughts?

keep calm wear lipstick

THE EYES HAVE IT

HELLOOOOOO my lovelies!

So today I wanted to talk about eye shapes. Why? Well as a makeup artist I believe that determining your natural eye shape is just as important as finding the most flattering colors for your lids and of course – matching your shade of foundation! Knowing how to apply eye shadow and liner for your eye shape, will help you better translate trends and techniques to fit your face. So read on to discover tricks for your eye shape – so you can make the most of your peepers!

brandi wide set

Wide set eyes are usually more than one eyeball width apart. To bring them closer together you can:

  • Use a  highlighter shade on the central portion of your upper lid
  • Rim your top and bottom lash line with a black liner as close to the inner tear duct as possible
  • Use a mascara comb to swipe all of your tiny lashes from mid eye to nose

camilla belle downturned

Downturned eyes have a slight dropping on the outer corners. To pull the eyes upwards appear upwards you can:

  • Creating a sexy cat’s eye shape (this is the perfect shape for it) to do so apply a liquid liner along the top lid and extend outward and upward at a 45 degree angle – this will create symmetry and add va-va-voom!
  • Blend a dark shadow from the edge of the eye inwards to the visible crease
  • Firmly curl the outer lashes and reapply mascara on the outer lashes

close set

Close set eyes are less than one eyeball width apart.  To create the illusion of more space you can:

  • Using a light eye shadow on the inner corners of your eyes – I suggest trying frosty white or sparkling nude hues.
  • Adding an extra coat or two of mascara or placing some  individual lashes, 1/2 or 1/4 corner strip lashes to the outer corner to pull the focus outward
  • If applying eyeliner, ensure it goes from thin to thick as you apply it from your inner to outer eye corner on your upper lash line and it extends a little bit beyond your outer eye corner

deep set

Deep set eyes are usually large and set deeper into the skull, creating the illusion of a more prominent brow bone. The eyelid can also look as thought it goes way back into your head. I would suggest trying to:

  • Brighten up the natural shadowing by dusting on a beige or warm metallic hue on the lid (think peach!) this will help the eyelids to ‘pop’ open and bring the eye forward
  • If you have this shape you will probably have a prominent brow bone, so, you can apply a contour colour onto here rather than in the crease.
  • More than likely the ends of your lashes graze your lids, so, be sure to apply waterproof mascara to prevent smudges

hooded eyes

Hooded eyes feature an extra layer of skin that droops over the crease, causing the lid to appear smaller. To draw the focus upward:
  • Diffuse darker shadow over and out past the crease.
  • Tight line the top waterline to intensify and enlarge your eye shape and thicken the lash base, which also can disappear under the lid fold. 
  • Use a light highlight shade on brow bone and inner corner along lash line

protruding eyes

Protruding eyes create the appearance of projected lids in the eye socket area. On the up side, the bulge gives you plenty of lid space to play with! To keep the lid from overpowering your look:
  •  Blend darker tones all over your eye because dark tones recede space and size (pushes the lid back), smokey eyes work great with this eye shape.
  • Apply thick liner along your upper lash line to further diminish some of the space.
  • You can also use a slightly lighter shade for the crease, and blend outward towards the brow bone.

asian eyes
 Mono lids (asian eyes) are usually flat on the surface and don’t have much of a crease if any and the Brow bone is less defined. To create definition and the illusion of dimension on your flat surface:

  • Using a gradient of eye shadows, dark to light. Shading the darkest colour the closest to the lash line, the soft neutral hue in the middle and the shiny colour at the brow bone
  • Always curl lashes for a lift and you can add some individual false lashes for extra flare
  • When lining your bottom lash lines, remember to smudge it out. But be careful – wherever you put darkness is where your eye is going to follow. If you only put it in the lower rim, it makes the eye seem smaller, but if you add liner to the lower lash line and smudge it out then it brings those outer edges forward, so it makes the eye appear larger.

round eyes

This eye shape is often large, and open-looking – the width and height is nearly the same. Personally I think these eyes are actually quite adorable and can be quite beautiful if you use your makeup correctly: 
  • Using a two to three eyeshadow shades apply the lighter eyeshadow from your lash line to your brow bone (your entire lid). You can also apply a bit of this eyeshadow under your lower lash line. Apply the darker shade in your crease and create a V shape on your outer eye corners. 
  • Ensure you extend the color upwards and outwards until it almost touches the outer tip on your eyebrow curve at about a 45 degree angle. This will help in create an illusion of an elongated eye thus reducing the round appearance of your eyes.
  • When using eyeliner I highly recommend tightlining your eyes and/or applying the liner to create a cat eye effect.
  • When applying mascara, you need to put more emphasis on your outer third of your upper eyelashes with less mascara on your middle and inner eyelashes.
 
almond eyes
 
The best way I can describe am almond-shaped eye is very simple, the inner corner of the almond-shaped eye resembles that of the tapered point of an almond and rounds up and out to a slightly upturned outer corner. People of many different ethnicities may have almond-shaped eyes so:
  • Feel free to experiment with different eye shadow placement, but a classic eye will always serve you well. Work with three shades and place the lightest shade on the inner half of the lid, the darker shade on the outer half and the crease, and the lightest shade on the brow bone
  • Because the almond-shaped eye can pull off almost any eyeliner look – I would suggest for everyday makeup, use eyeliner to highlight that great shape. Put eyeliner on the outer half of the upper and lower lash line to make your eyes look large and romantic. Make sure to use light strokes and apply lightly toward the middle, getting darker and heavier toward the outer edge.
  • I would suggest considering a more angled brow rather than one with a rounded arch. 

I put this together to help explain and showcase the different types of eye shapes out there and give some tips on how to make the most of what you have. You may even realise that you’re a combination of two or more (like me).

However I want to leave you with one final thought:

happy girls

Cutting the Crease

Hey my loves!

When you think of cutting the crease – what celebrities spring to mind? For it would have to be Adele and Kim Kardashian –  as you can see below both Adele and Kim K nail it (or rather their makeup artists do ;)) – ranging from the dramatic to the soft.

adele

 kim k cut crease

Cutting your crease helps to really open up your eye and make it pop – personally this is my go to look for every day as I love how it makes my eyes appear bigger than they normally are. There are many ways to wear this look – for me I usually go more subtle. So I did a quick and easy tutorial for you – check it out and let me know what you think

~ Step 1 ~

Firstly I like to prime my eye using MAC’s paint pot in Painterly applying it with my Sigma P80 precision flat brush all over my lid and blending it up to my brow bone

prime

~ Step 2 ~

Then taking my MAC 239 brush eye shader brush, I use a combination of MAC’s Ricepaper and Retrospeck  and apply that all over my lid.

lid

~ Step 3 ~

Here is where I start to define my crease  – for this I use one of  favourite brushes by Sigma – the E45 small tapered blending brush. I find this brush is PERFECT for applying colors to the crease. The first colour I am adding to the crease is MAC’s Cork – using my E45 brush I apply it into my crease blending it out softly, using a windscreen wiper motion. Then repeating the same process but using MAC’s Quarry over the top. You should now have a nice light brown cut crease appearing. Depending on how comfortable you are you might decide to stop here and apply your liner and mascara – or you can follow my other steps for a more defined cut crease. 

crease 1

~ Step 4 ~

Taking the same E45 brush by Sigma I apply Oktoberfest – from my Coastal Scents 252 Ultimate Palette – and repeat the same cut crease motion as in Step 3 – but as you will see the crease darkens to a lovely rich brown.

crease 2

~ Step 4 ~

Again you could choose to finish it up here and it would still look lovely, however for me I wanted to add a pop to this crease so I chose to take Vibrant Red from the same Coastal Scents Palette  – and by adding that into the crease and blending with my E45 brush by Sigma, very thoroughly out into and just over the crease I get the colour effect I am after – a light red-brown combination which I believe helps make my eyes stand out (please excuse the uncombed brows).crease complete

~ Step 5 ~

Taking my E65 small angle brush by Sigma and Maybelline’s Eye Studio Lasting Drama Gel Eyeliner in Blackest Black – carefully line my lid, flicking it out only a little to create a suble cat eye effect.

cat eye crease

~ Step 6 ~

I Finish off my eyes by applying a few coats of Maybelline’s new Volum’ Express® the Mega Plush® Mascara in blackest black to my top lashes and just one coat to the bottom. HEY PRESTO we’re done!

cut crease final

So don’t be shy – go and give it a go! Once you’ve tried it a few times you’ll love it I’m sure 🙂 So hope you enjoyed and I would love to hear any feedback – especially if you gave it a go yourself 🙂

xoxo

30 Day Challenge – FINAL WEEK –

Apologies for the delay my loves, I’ve been a bit sick this week so I was a tad behind in creating the last of my looks… However I’m all better now and have managed to catch up. Anyway – here I am, in the final leg of my self-imposed 30 Day Challenge. I will admit there have been days where I found it difficult to think of what to do or if I was going to execute it in time to be ready for work 😉  So I hope I managed to keep them interesting and different enough for you guys – let me know what you think 🙂

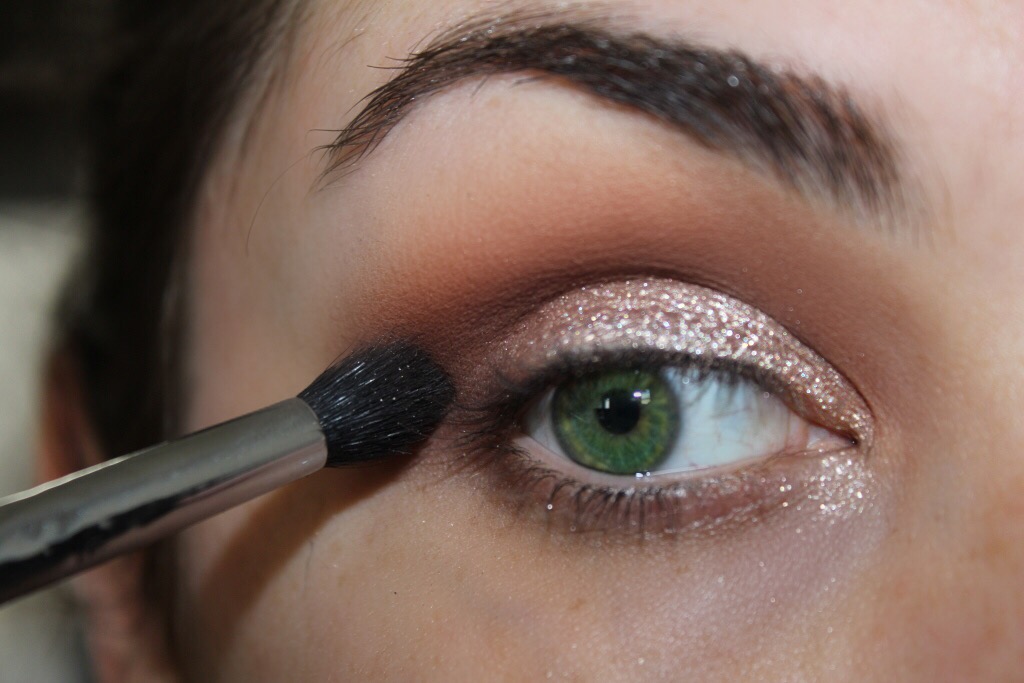
Day 24. I wanna be famous – Every now and I see a celebrity on the red carpet at a special event, movie premier, award ceremony etc that makes me think wow! Something about the look makes me do a double or even a triple take. I think these are my favourite looks to tackle mainly because it’s a challenge for me to copy or try a tricky style or adapt it to suit my eye shape. I know for a fact there are a few celebrities that are favourites for me but one that I just love is the ever gorgeous Mila Kunis – I love way she wears such luxurious browns and golds together and don’t even get me started on when she wears a smokey eye. So todays look was inspired by her. I hope I was able to do her justice.

iwannabefamous

1.  Primed my lid by using my faithful MAC Paint Pot in Painterly

2.  Applied All that Glitters by MAC all over my lid

3.  Using a mixture of Bronze and Mulch by MAC into my crease and on my outer “V” extending it upwards and outwards so as to lift my eye – all the while ensuring it is blended out

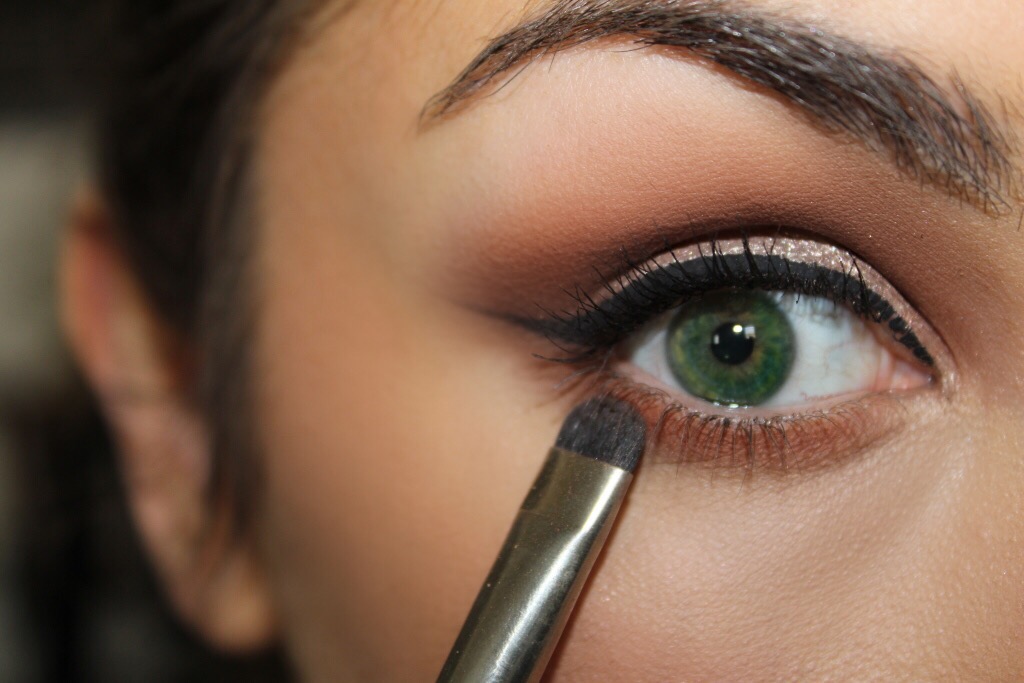
4.  Taking a soft kohl black eyeliner, I used Rimmel’s Scandaleyes Waterproof Kohl Kajal Eye Liner, line the top of your lid then using an angled eyeliner brush – smudge it out to soften the line

5.  Taking the colour Luna from the Sigma Resort Palette I highlighted my inner corner and tear duct

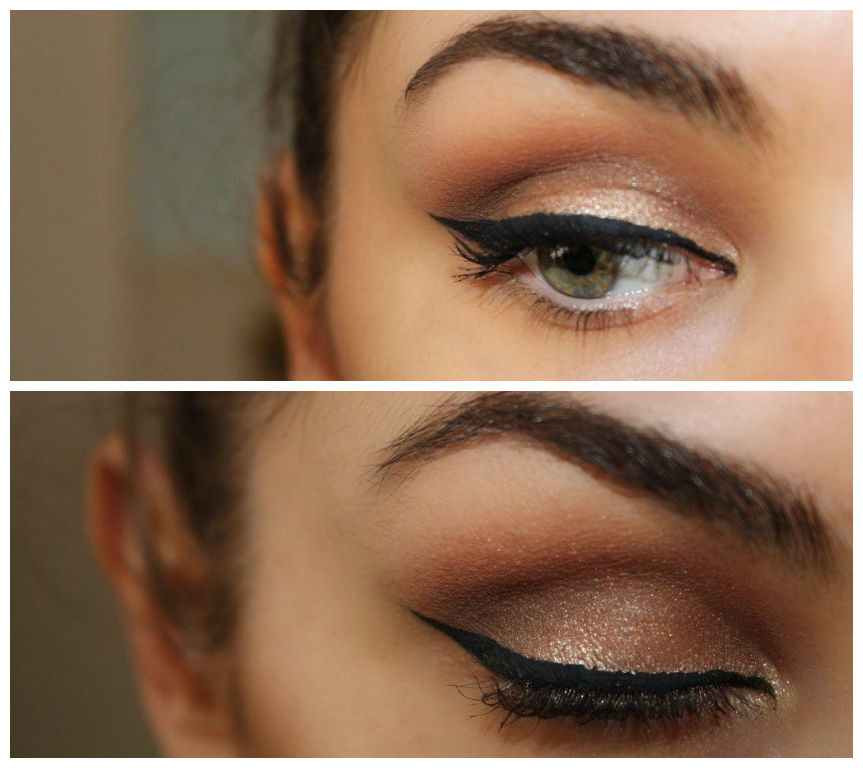
6.  Coating my top and bottom lashes with my Goddess Mascara by Eye of Horus

7.  Finishing off the look by applying my new favourite lashes in style No. 1 by Lashes in a Box

Day 25. Contour – Made famous by Kim Kardashian (love her!) – contouring has become a common step in my makeup routine – however I have to say it surprises me that for a lot of women, contouring is often a skipped step. In my opinion when you apply foundation to your entire face, you are creating a blank canvas, making it critical to go back and add the dimensions back in. Technically, contouring is about shadows and light; if you’ve ever taken an art class you’ll know that you use darker shading to push an area inward and lighter shading to pull an area outward. So when contouring your face you use this method to help create the appearance of a stronger jaw line, more defined cheek bones, and a slimmer face or nose etc.

contour

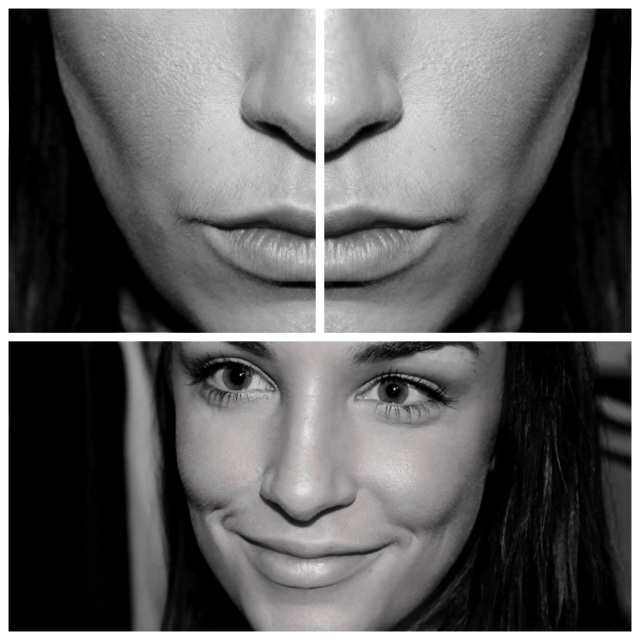
1.  Applied my new favourite foundation – Revlon Colorstay Whipped foundation in colour True Beige and ensure it is blended down to my neck with my Beauty Blender sponge

2.  I know where my cheekbones are and have been practising this for a while, however, if you are new to contouring I suggest you look in the mirror and suck in your cheeks – this instantly shows you where your cheekbones are

3.  Then taking your desired medium (bronzing powder/cream bronzer/darker cream foundation) with a flat-headed bronzer brush just slightly under cheekbones from the hollows to your ear

4.  Sweep bronzer in circular motions directly on temples. If, like me, you have a rather spacious forehead you can continue the contour along the hairline. You can also contour directly underneath your jaw line

5.  I then make sure I blend edges with my Beauty Blender sponge

6.  Finishing it off by setting it with my Ben Nye Bella Luxury Powder in Banana

Day 26. Bright times – For this look I chose some colours that I love, and think compliment each other very well. My look definitely created an impression around the office that day 😉 … bright times collage

1.  Started off by priming my eye using NYX’s Jumbo Pencil in Milk – blending that into my lid and up into my crease

2.  Using my Coastal Scents 252 Ultimate Palette I took a bright sky blue colour and placed that on my lid leaving the outer “V” bare

3.  Then from the same palette I took a dark violet shade and blended that into my outer “V” and into my crease

4.  Taking a mixture of the blue and purple colours I used I blended that underneath my eye along my lower lash line sweeping it upwards in a cat eye fashion

5.  Taking Luna from the Sigma Resort Pallete I highlighted my inner corner and tear duct

6.  Taking Rimmel Scandaleyes Waterproof Kohl Kajal Eye Liner in Black I tightlined my upper and lower waterline. Then taking Eye of Horus Liquid Define Liner I lined my lid

7.  Taking the Goddess Mascara by Eye of Horus I coated my top and bottom lashes

8.  I then applied my new favourite lashes No. 1 lashes Lashes in a Box Lastly I take my Sephora Collection Glitter Eyeliner in Black and go over my black liner I created earlier

9.  Using my Rimmel Scandaleyes Waterproof Kohl Kajal Eye Liner in Nude, I draw a line in between the top and bottom shadow separating the two thus creating a double line effect.

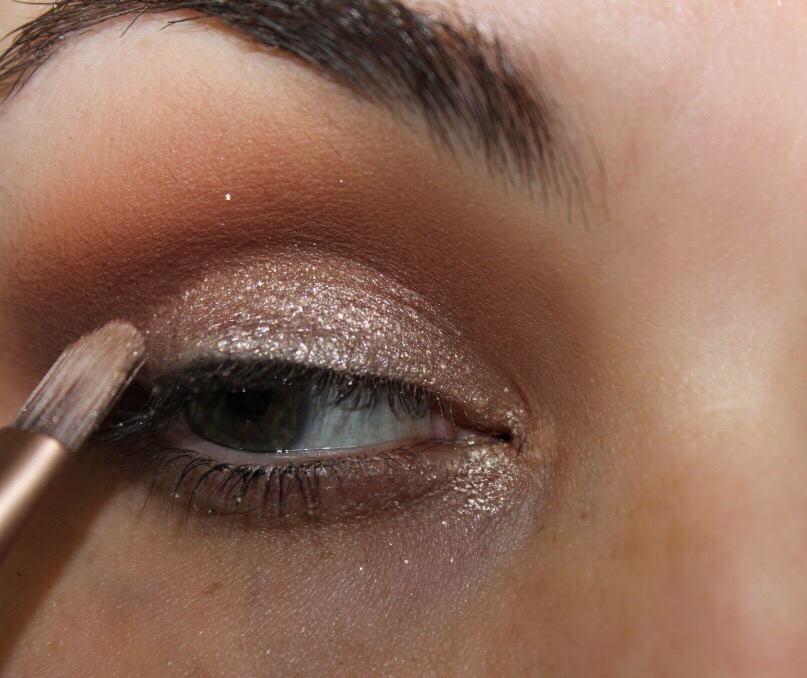
Day 27. Video Killed the Radio Star – I don’t know about you, but I tend to get a lot of my inspiration from music videos. Some of my personal faves that I look to time and time again are Nicki Minaj, Katy Perry, Jennifer Lopez, Rihanna, and Lana Del Ray. I love that they range from the crazy colourful to the beautiful and eye-catching. So for todays look I took inspiration from the gorgeous, age defying, Jennifer Lopez – in her new clip “Live it Up”. In this clip we see her with a sultry smokey eye, a bronzed golden eye and a very out there mustard lip colour to a heavier sexy night-time look. Which one to choose? I went with the bronzed beach look. I love the other looks but this one just took my breath away – there is something about how luxurious the golden bronze looks on her eyes.

jlo live it up

video killed the radio star

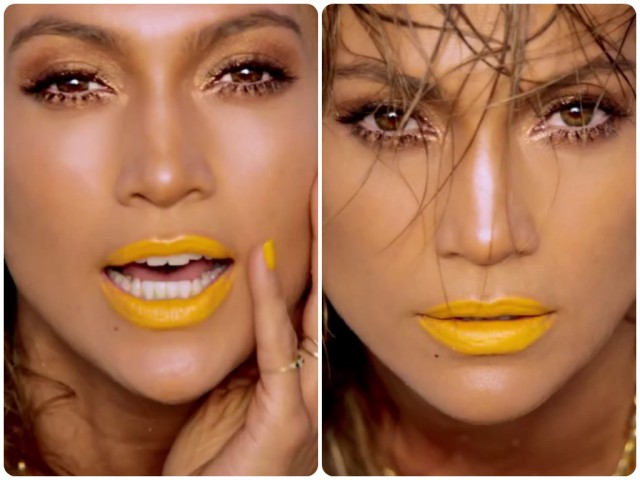
1.  For this I primed my lid and lower lash line with NYX Jumbo Eye Pencil in Bronze – blending it into my lid and up into my crease

2.  to intensify this look I took MAC’s Pigment in colour Melon and applied that over the top and then taking it down to my lower lash line

3.  Using a mixture of MAC’s Mulch and Bronze I applied that to my outer “V” to smoke it out and add some depth

4.  Taking MACs Power Point Eye Pencil in colour Duck I lined my upper lash line and smoked it out with an angled eyeliner brush

5.  Using my Goddess Mascara I coated my top and bottom lashes heavily – unfortunately I ran out of time so I couldn’t add any falsies to my look but if you can I would advise adding in some Individual false lashes as it will really open up the eye further and give the eyes that lovely soft fluttery look that Jennifer has.

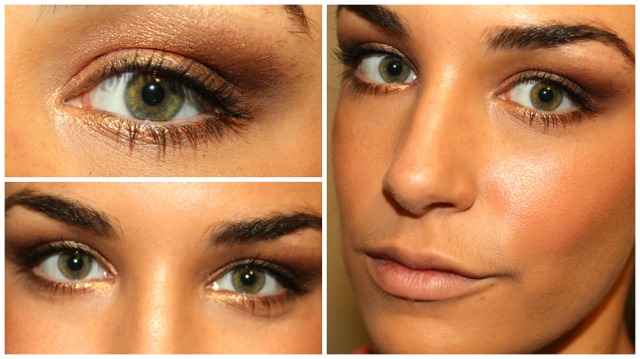
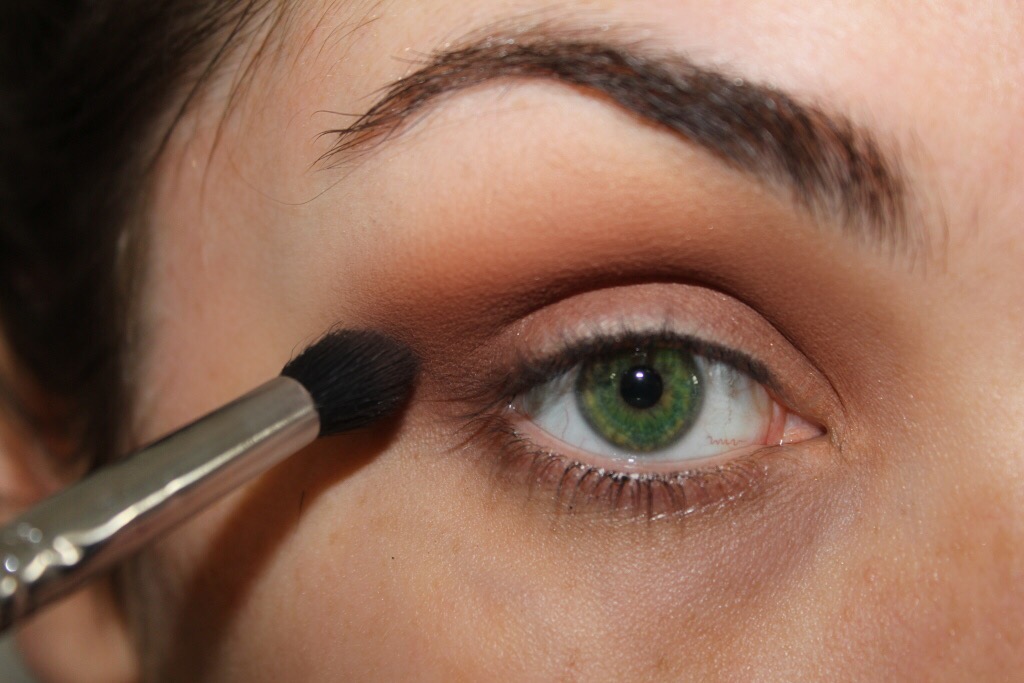
Day 28. Pop goes the Weasel – there are many ways you can make your eyes “pop” but my favourite is to use a color that contrasts with your natural eye color. Now, some of you might be thinking “how the heck am I supposed to know which colors to choose?” NEVER FEAR! The answer lies within the color wheel! How you might ask? Well, all you have to do is locate your eye color on the wheel and the color directly across is the perfect one for you! Keeping in mind you could also use a bit of your natural eye color, or a slightly darker version, to bring out the color!

Color_Wheel_hi_res_21153756

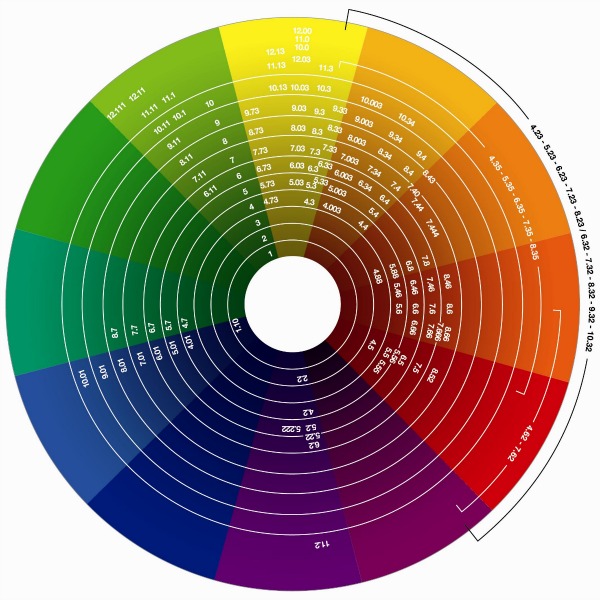
So for me, my eye colour is usually green but, as weird as it sounds, my eye colour greatly depends on what mood I am in, so when I am happy they are at their greenest. If you look at the colour wheel above you can see that for me my colours range from purple to orange and include rust colours and deep bronze’s. For todays look, see below…

pop goes the weazle

1.  Primed my eye using MAC’s paint pot in Painterly

2.  Taking a MAC pigment in colour Blue Brown – I chose this colour as it is a brown but with a blue-green pearl to it which should complement my green eyes – I then applied that all over my lid and into my crease

3.  Taking a mixture of MAC’s Cork, Quarry and Smut I smoked out the outer V and into my crease

4.  Taking Luna from the Sigma Resort Pallete I highlighted my inner corner and tear duct

5.  Using my Eye of Horus Liquid Define Liner I lined my lid

6.  Finishing off my look by coating my top and bottom lashes with Goddess Mascara by Eye of Horus and applied some false lashes No. 1 lashes Lashes in a Box – what do you think?

Day 29. Ombre –

This two-tone look subtly contours the mouth. A darker shade around the outer edge of the lip adds definition, while a slightly softer tone in the center reflects light and creates the illusion of fuller, juicier lips. In my opinion the key is to use two shades in the same color family. They should gradually fade into each other for a lovely ombré effect.

ombre

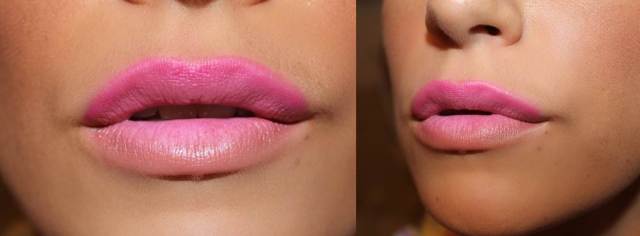
1.  The first and probably most important step is to prepare your lips. To do this I used my favourite lip scrub by Sara Happ  and then apply a nice thick coat of Lucas Papaw Lip Ointment (hands down the best out there – it is a miracle worker for any set of dry lips)

2.  I then applied a generous coating of foundation to my entire lip. Beware this tends to make you look super creepy, but it helps your lip to “pop” more and your lipstick to last longer.  

3.  Next I applied a nude lipstick (I chose Shy Girl by MAC)  to my entire bottom lip. Once it was well blended I went in with the first color. I chose to use a lip pencil –  Le Crayon Lèvres Precision Lip Definer in colour 49 Rose Corail – applying this to my top lip and using the brush that comes with it, blending it out softly to top centre of my bottom lip. At this point I blended the pencil out, adding a little bit at a time, as necessary, until I had 3 fairly clear colors happening on my lower lip.

4.  The next color I added was 55 Fuschia (same Chanel Lip Pencil mentioned in step 3), I covered my entire top lip, but didn’t worry too much about getting too close to the edge of my top lip since I’d be covering that area with a darker shade anyways. At this point I also added significantly more of the Lip Pencil – 49 Rose Corail as mentioned in step 3 – to the innermost part of my bottom lip (still using the brush that came with the pencil)

5.  Now, here comes the tricky part…especially since it looked like horrible before I blended it out. I added MAC’s Candy Yum Yum lipstick along the top half of my upper lip, again, I didn’t worry about getting too close to the edge, I blended out from that point anyway.

6.  The next step was to blend. Depending on how confident you are you can use your little finger or a lip brush even a cotton tip – I used a mixture of a lip brush and my finger to blend out only the lipstick until it no longer looked harsh

7.  Then using  the same lip brush (I gave it a quick clean) I blended and precisely shaped the outer line of my lip and further blended the fuschia with the rose colors on my upper lip.

8. Taking my Lucas Papaw ointment I applied it gently by dapping over my lip so as my lips would look nice and glossy. And that’s THAT!

Day 30. Lashtastic – its amazing how such a simple eye can be transformed by adding a pair of false lashes – natural or slightly dramatic. For the look I had today I went with a slightly more dramatic set than I would normally wear… what do you think? Too dramatic or just right?

lashtastic

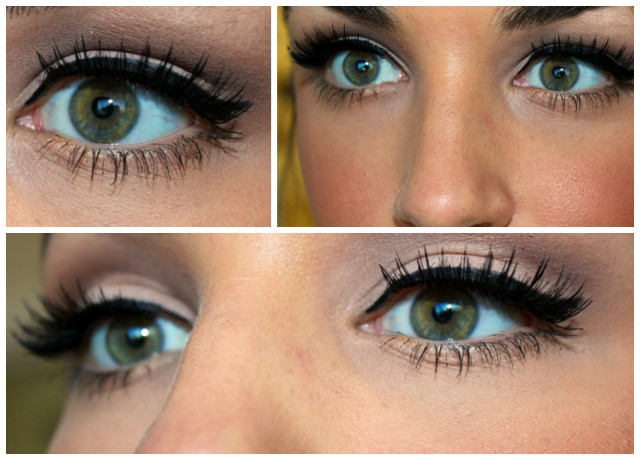
1.  Primed my lid with MAC’s paint pot in Painterly

2.  Applying MAC’s Blanc Type all over my lid and up to my brow bone. Then I Cut my crease with a mixture of MAC’s of Cork, Quarry and Smut – blending it out thoroughly

3.  I then lined my lid with Rimmel Glam Eyes Professional Liquid Liner in black and flicking it out at the ends to create the desired cat eye effect

4.  Finishing off my look by coating my top and bottom lashes with my Goddess Mascara – then applying my No. 4 false lashes by Lashes in a Box.

SO! THERE WE HAVE IT! I made it, I completed the 30 Day Challenge – albeit a tad late, but completed none the less. I hope you enjoyed it and don’t be afraid to let me know what you thought or what one was your favourite.

XOXO